This is a consolidated version of the technical documentation of Convier.
File: API sources
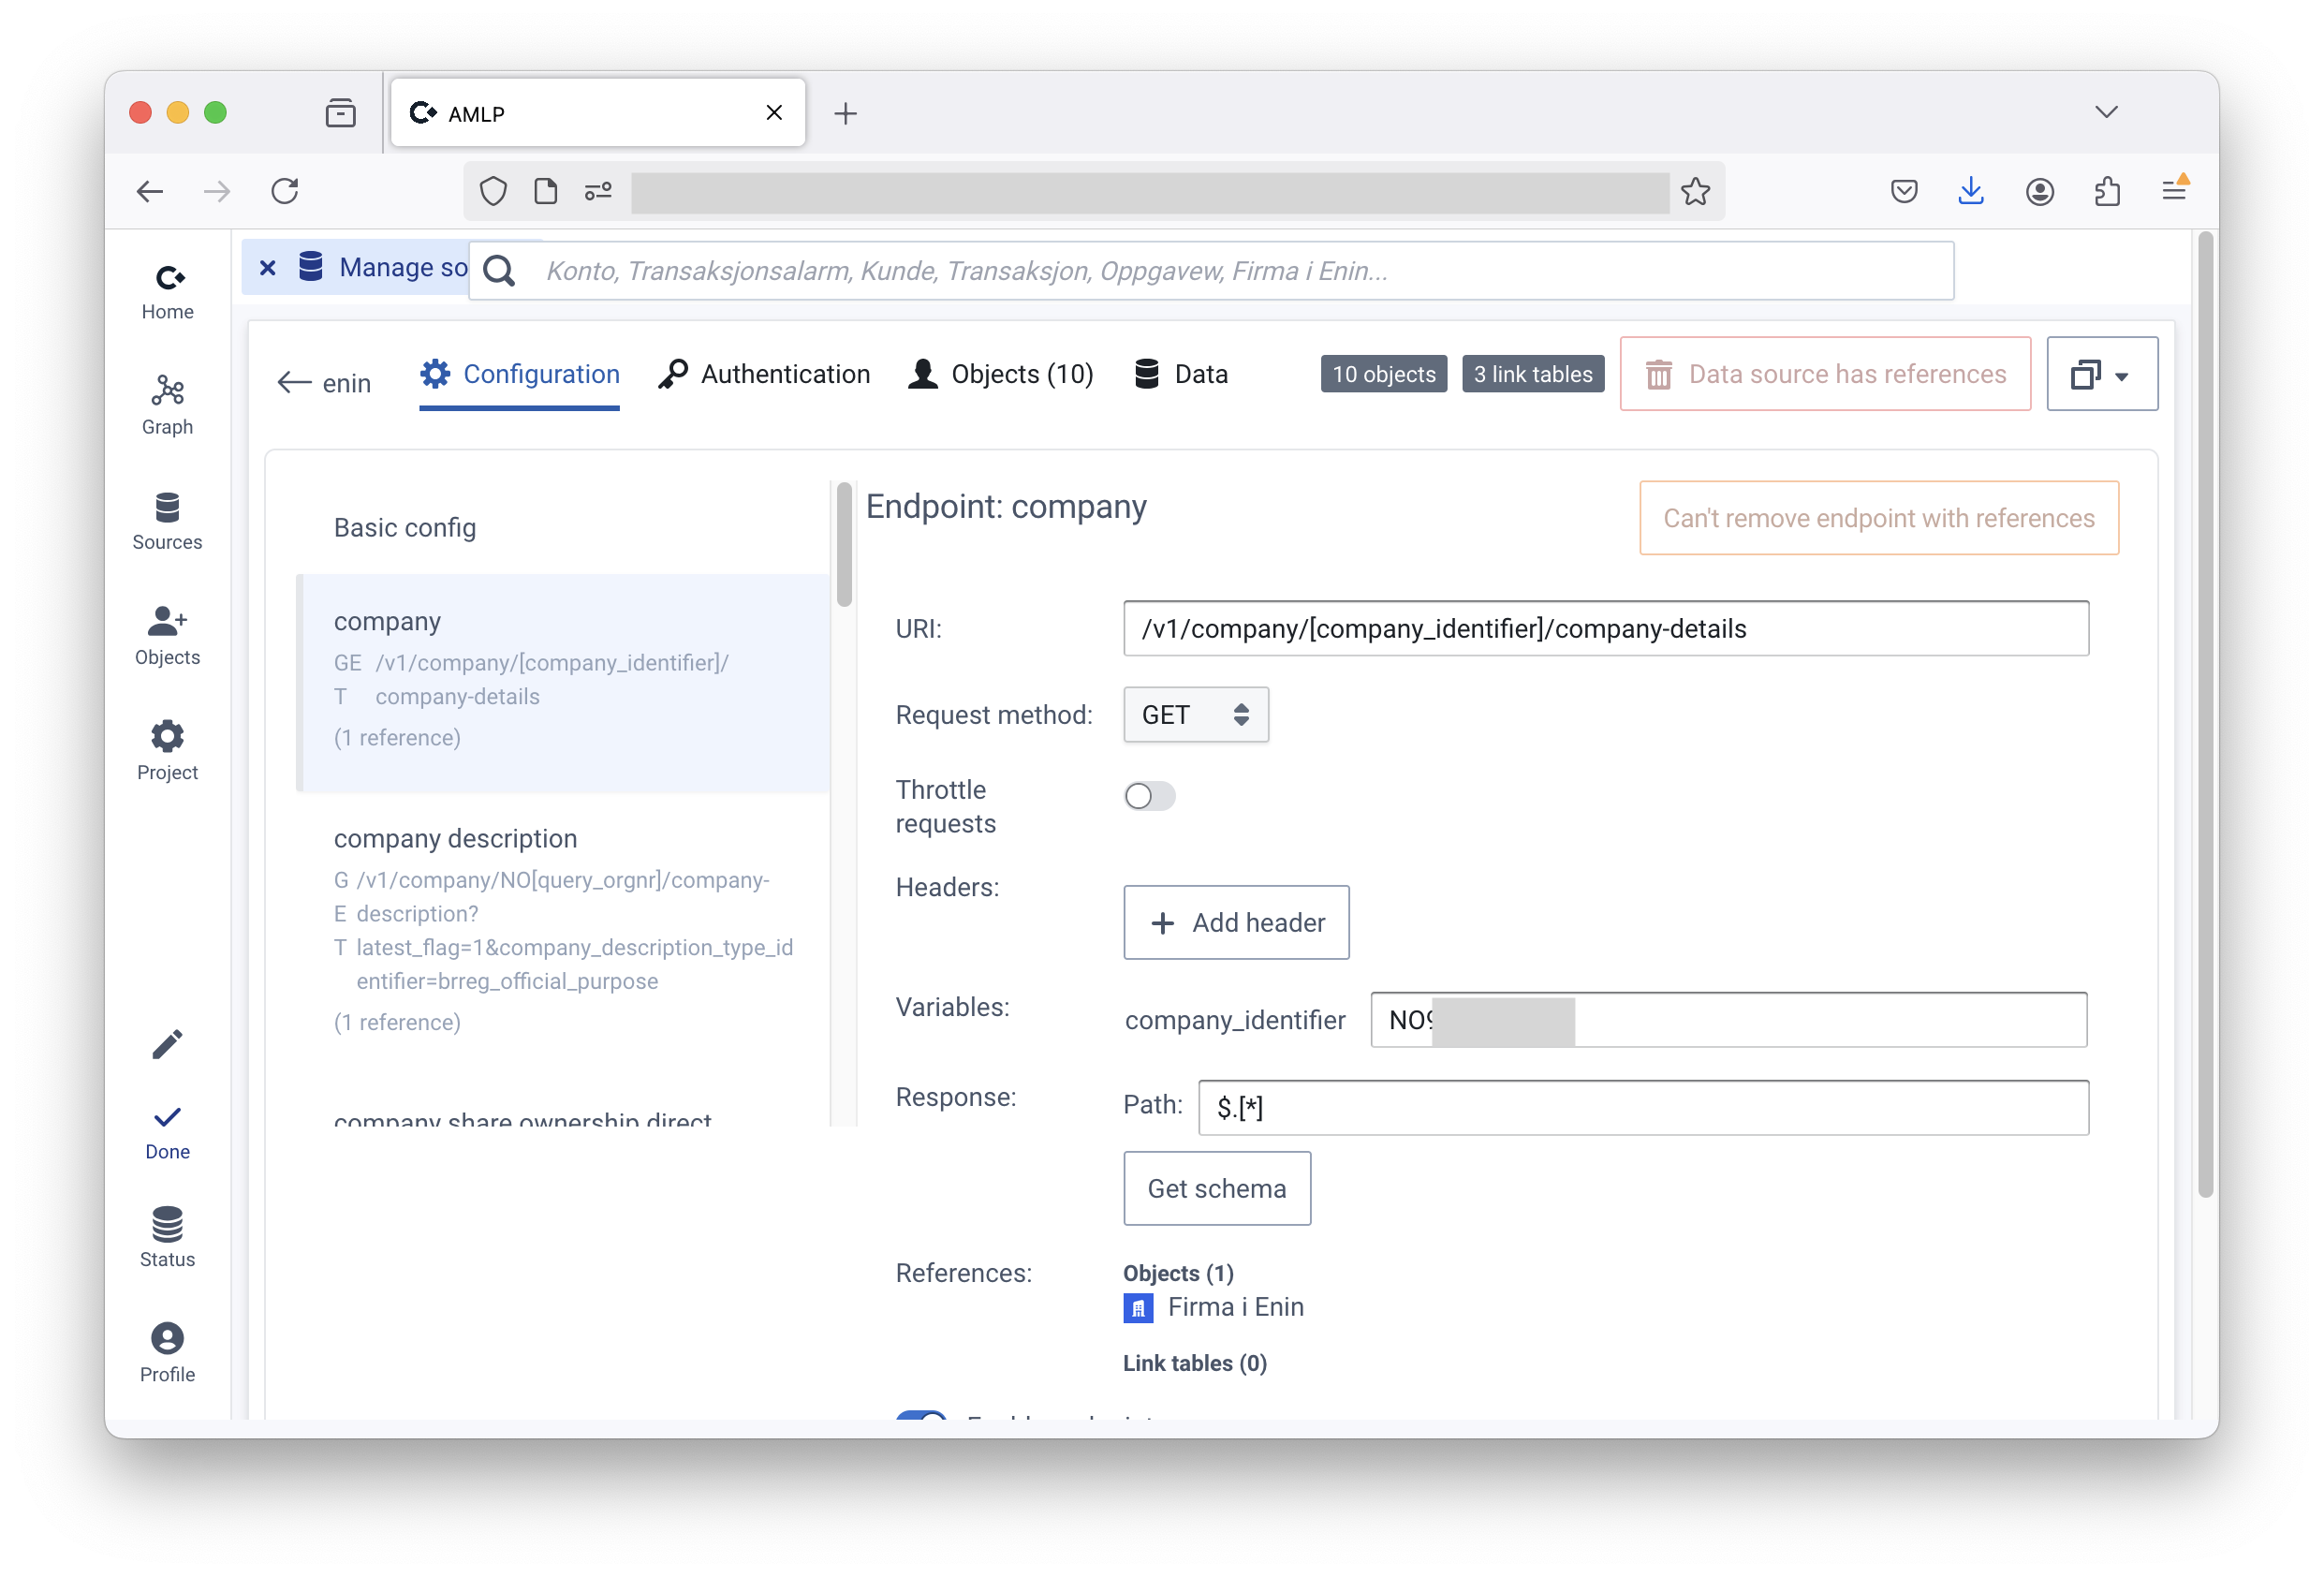
Convier can integrate with most JSON-based APIs. Reach out to support@convier.com if you need assistance configuring a particular source.

File: Introduction
Convier is a webapp served by a Java HTTP server that runs as a single Docker container within your organization’s environment, e.g., as an App Service or Virtual Machine in Azure or on-premises using providers like VMware or Citrix. No data leaves your network, and Convier does not require to store or copy any data to operate: all data is fetched from your existing databases and services on demand. Data is stored together with saved reports. Reports, if configured, are stored in your existing CRM, or in a database of your choice. Convier also does not require a database server, as configuration is stored locally. Convier runs in your existing Azure tenant/organization or equivalent.
Getting started with Convier consists of three steps:
Resources from Convier are ready to assist with all three steps, including training users once the system is up and running.
The preferred way to install Convier is as an App Service or Virtual Machine that can be accessed directly from employee laptops and from within the company intranet.
For user authentication, the preferred method is Single Sign-On (SSO) with OIDC, for example, Microsoft 365 / Entra ID. Convier can run with an embedded OIDC provider for user authentication and authorization, but that is not recommended.
Convier has three different release tracks with different update intervals:
convier.azurecr.io/convier:releaseconvier.azurecr.io/convier:stable-stagingconvier.azurecr.io/convier:stableIt is common to create a User Acceptance Testing instance that follows the stable-staging track. stable-staging normally gets updated one week before stable, which gives time to perform testing when necessary.
Convier is designed to run with minimal resources within a Docker container. It consists of a server component and a browser-based web app that is provided to users by the server.
The primary requirement is a physical or virtual machine capable of running Docker. A Linux host is preferred but not required. The Docker container will use storage mounted on the hardware, or a provided database, to persist configuration.
The estimated required resources depend on the intensity of use and the amount of data being processed.
| Concurrent Users | RAM | CPU Cores | Disk Space |
|---|---|---|---|
| 1 - 2 | 4 | 2 | 4 |
| 2 - 10 | 8 | 4 | 8 |
| 11 - 30 | 16 | 8 | 16 |
| 31 - 50 | 20 | 16 | 24 |
Requirements for the hardware/laptop users accessing the Convier web application:
The web browser must allow cookies for Convier to maintain user sessions.
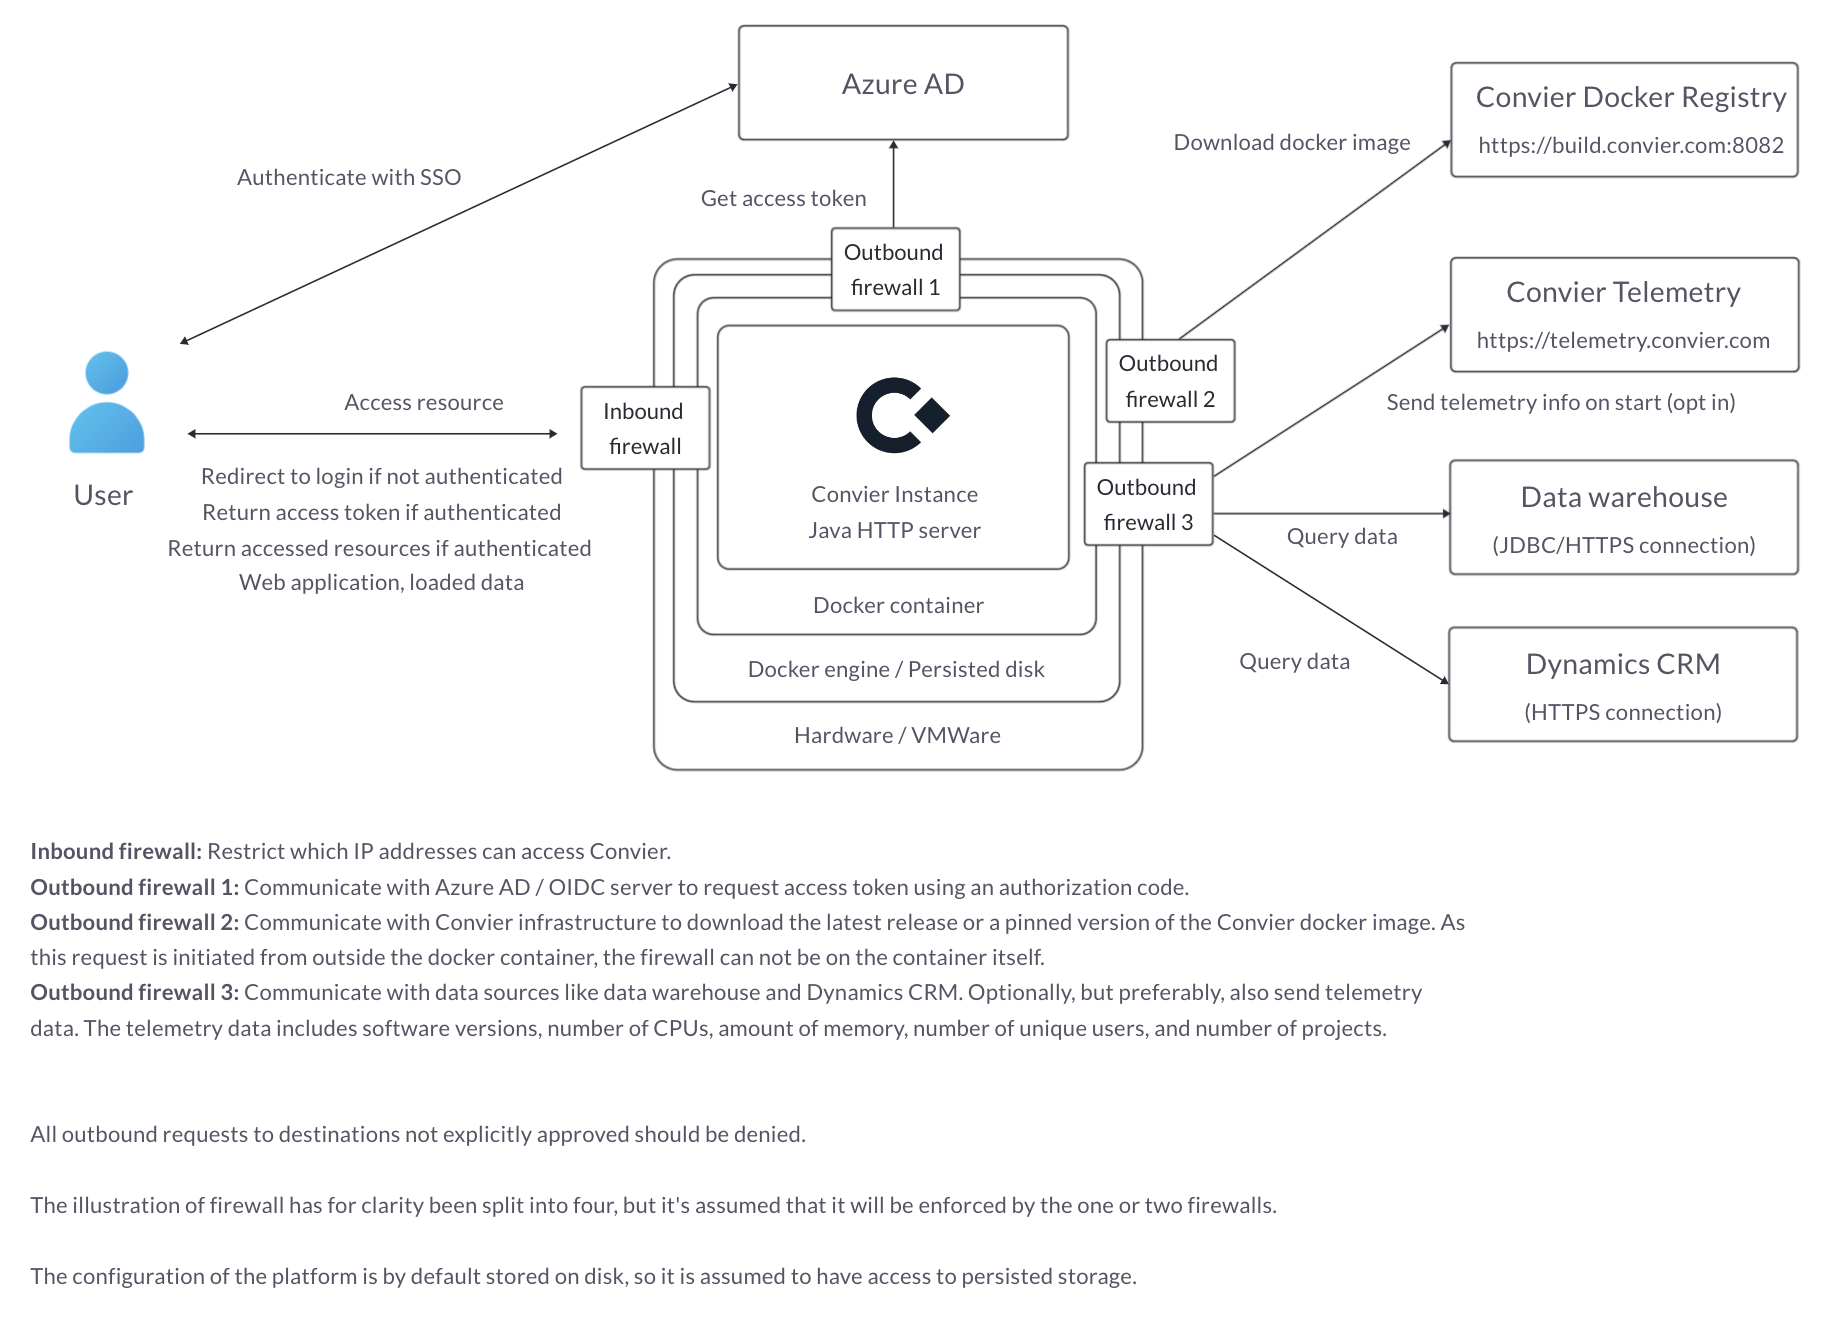
A high-level overview of the application architecture with required connection points:
See Running as an App Service in Azure
Make sure you have docker installed: https://www.docker.com/ and optionally docker-compose plugin.
docker login convier.azurecr.io
You will be asked for credentials. Get in touch with us if you don’t have these.
docker run -p "0.0.0.0:80:14445" \
  -v ./data/app:/opt/convier/data \
  -e JDBC_CONNECTION_STRING='jdbc:sqlite:/opt/convier/data/internal.db' \
  convier.azurecr.io/convier:stable
version: '2'

services:
  convier:
    image: convier.azurecr.io/convier:stable
    container_name: convier
    restart: always

    ports:
      - 0.0.0.0:80:14445

    volumes:
      - ./data/app:/opt/convier/data

    environment:
      - JDBC_CONNECTION_STRING=jdbc:sqlite:/opt/convier/data/internal.db
Then run:
docker-compose up -d
Check logs:
docker compose logs -f convier
A health check endpoint is available at /convier/ping without authentication. It returns an empty HTTP 200 response. This endpoint is also the most relevant for readiness/liveness checks in a Kubernetes environment.
The Convier application supports horizontal scaling, but for session management it is required that the load balancer supports session pinning to make sure that requests from a single user are directed to the a single instance.
Upgrades to Convier do require manual migrations. Normal downime during a single instance upgrade is between 30 seconds and 300 seconds.
docker compose pull && docker compose up -d
As Convier stores no data, only the configuration database needs to be backed up. When running an App Service with a persisted home folder, this backup is by default performed automatically.
Convier stores no customer data, which limits the privacy challenges. The configuration database may contain customer data used for testing purposes, but this can be avoided, e.g. by testing on synthetic data in a User Acceptance Testing environment. The contents of this configuration is stored with AES256 encryption, where the symmetric key is provided to the application as an environment variable/secret.
Within the Convier application, each user is assigned two different roles: One for the application as a whole, and one for each project. The roles are determined by the authentication provider, for example Azure AD.
MANAGEAUDITREADOne users to instance-level role MANAGE can add external data sources (limited by firewall settings) and also track high-level application usage. By default, only MANAGE role can create new projects.
The AUDIT instance role can query the internal audit log database, if enabled
OWNMANAGEREADThe READ role is only able to access data, and make individual configuration changes that can not be shared with others without approval. They can not add external data source connections.
The MANAGE project role is able to share configuration changes with others, and is usually reserved for Convier personel and customer subject matter experts.
The OWN project role can do the same as the MANAGE project role, but can also assign project roles to others.
File: Installation wizard with secret store
By default, Convier reads config like OIDC client ID and secret from environment variables, but configuration may also be fetched from a secrets store if running in a supported environment (e.g. App Service).
To fetch config directly from a key vault in Azure when running as an App Service, do the following:
Key Vault Secrets OfficerAZURE_KEY_VAULT_NAME
AZURE_KEY_VAULT_URL if not a standard URLKey Vault Secrets UserGOOGLE_SECRET_MANAGER_PROJECT_ID=<your project id>SERVER_PORT=80INSTALLATION_MODE=true or create secret (INSTALLATION-MODE=true).INSTALLATION_PASSWORDUSE_SECRET_STORE=trueJDBC_CONNECTION_STRING -> JDBC-CONNECTION-STRING)INSTALLATION_WIZARD=falseFile: Data Health Checks
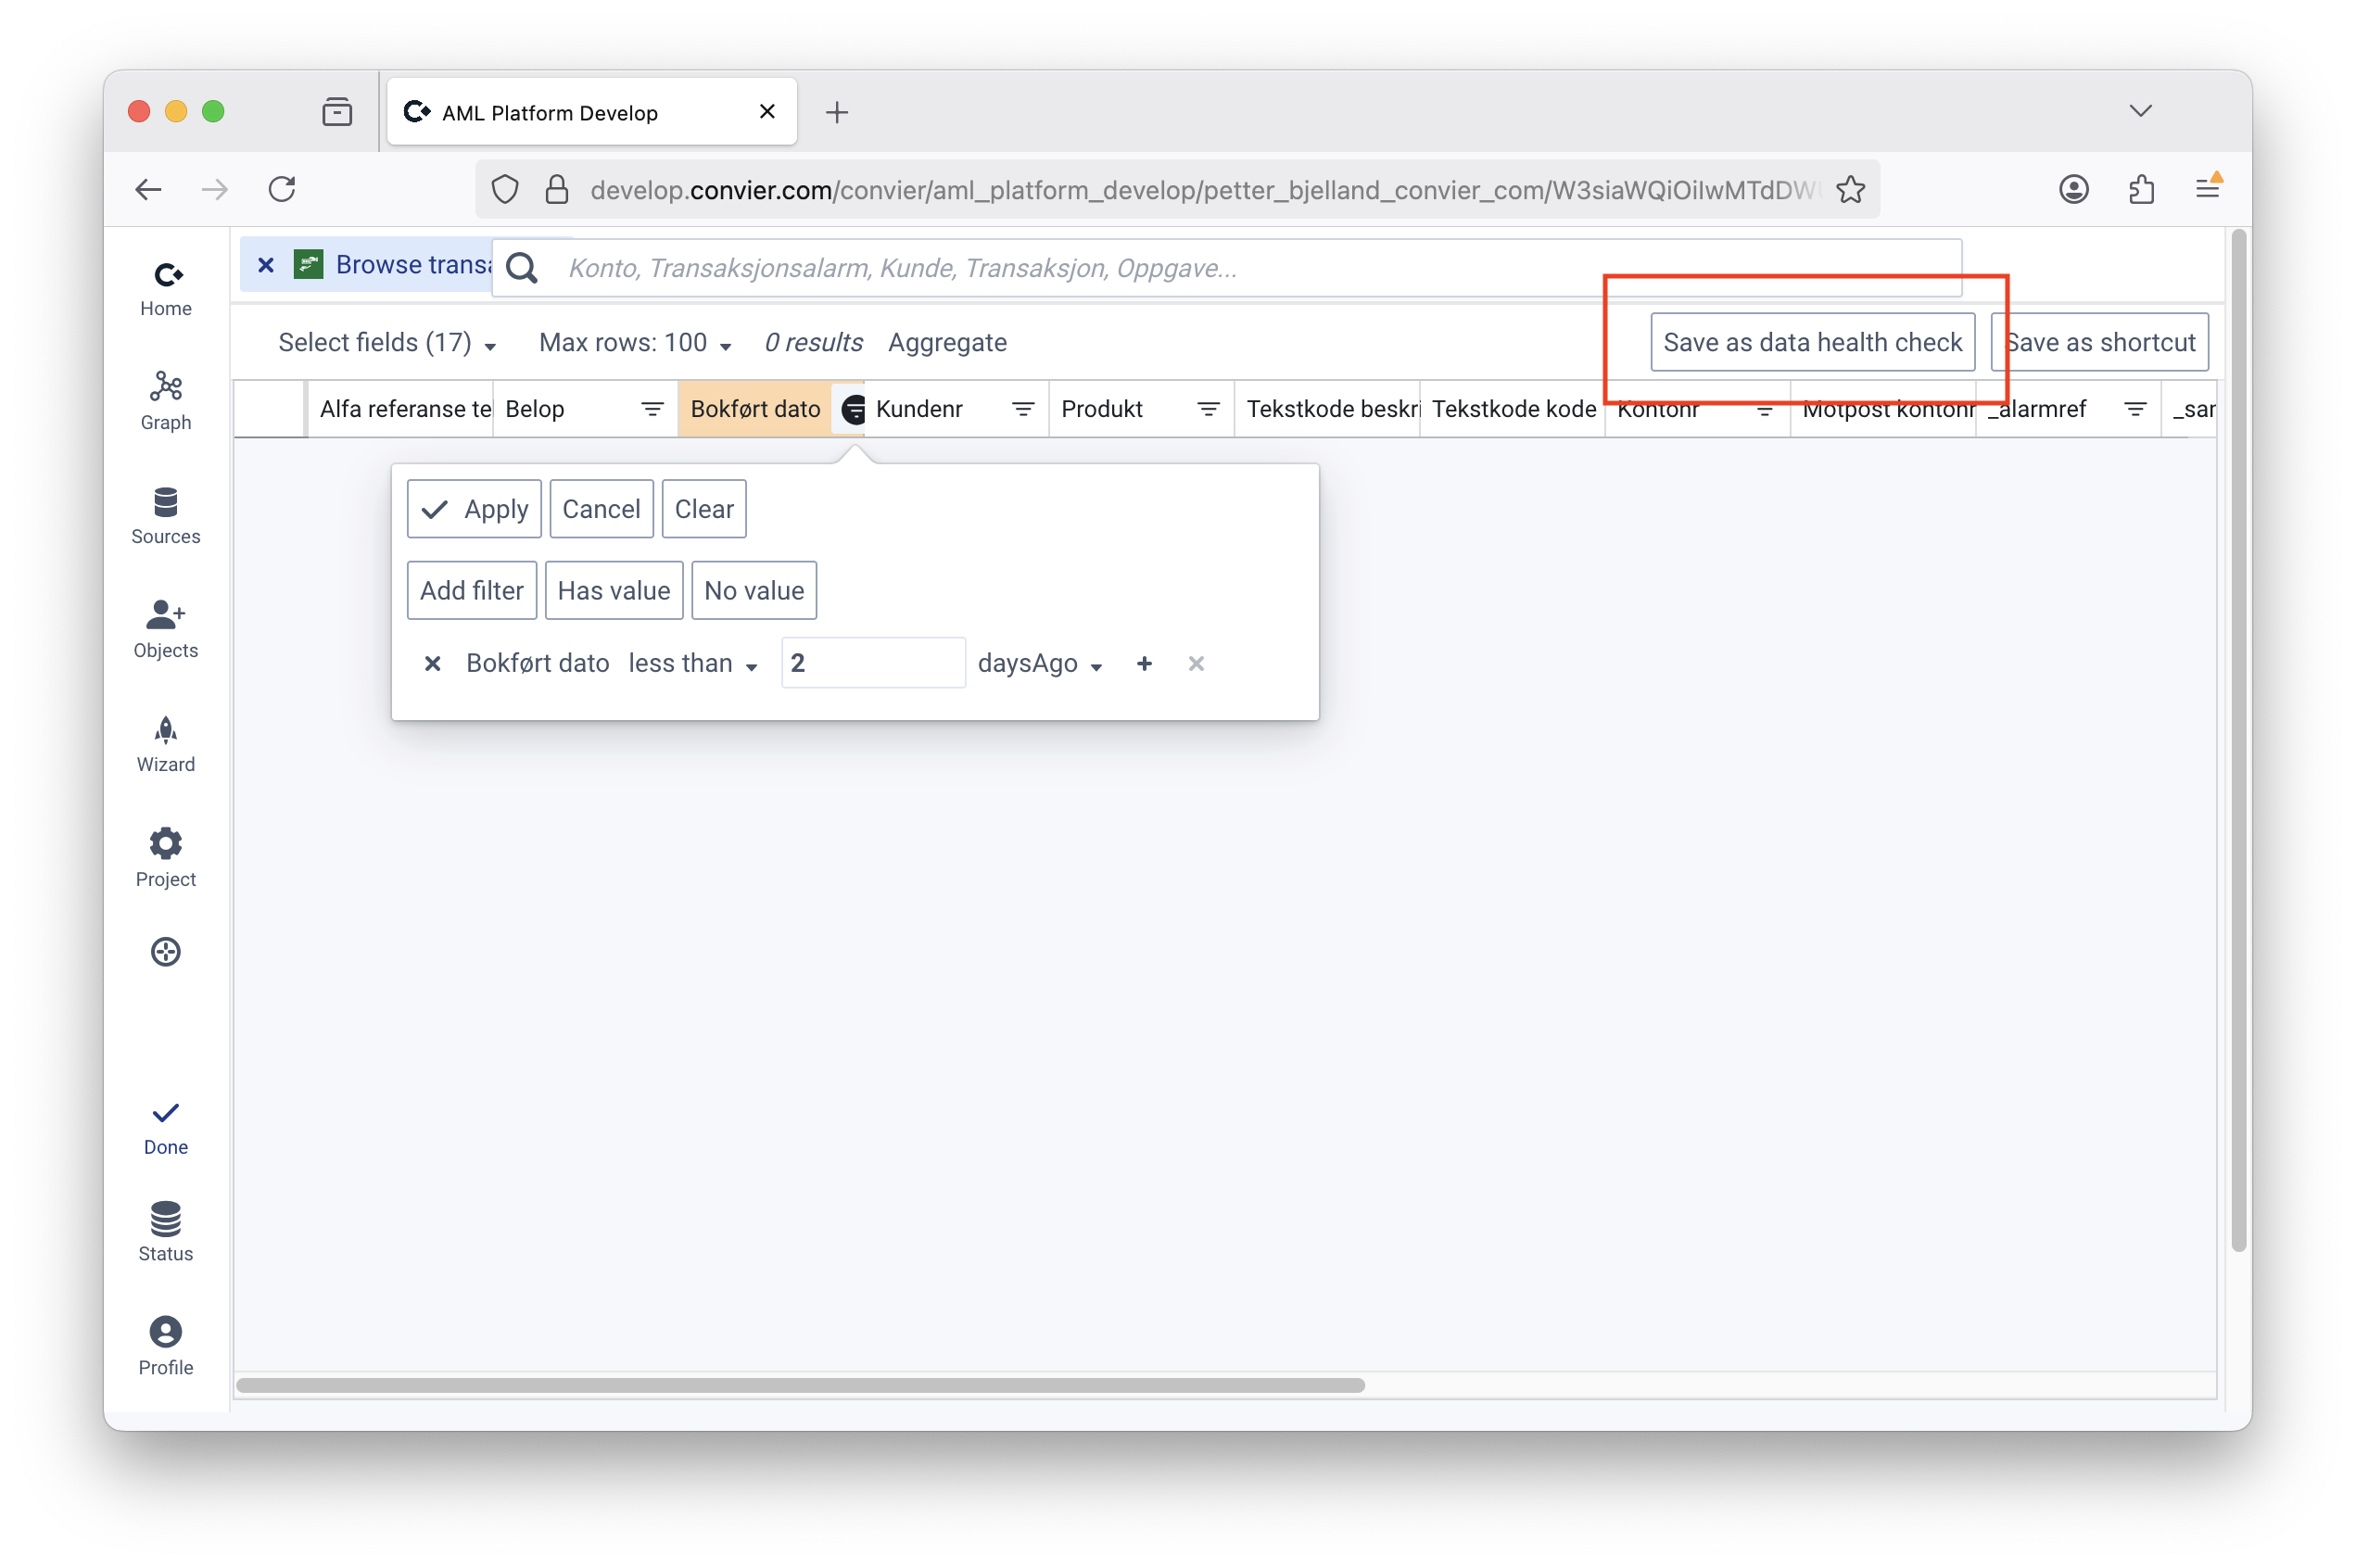
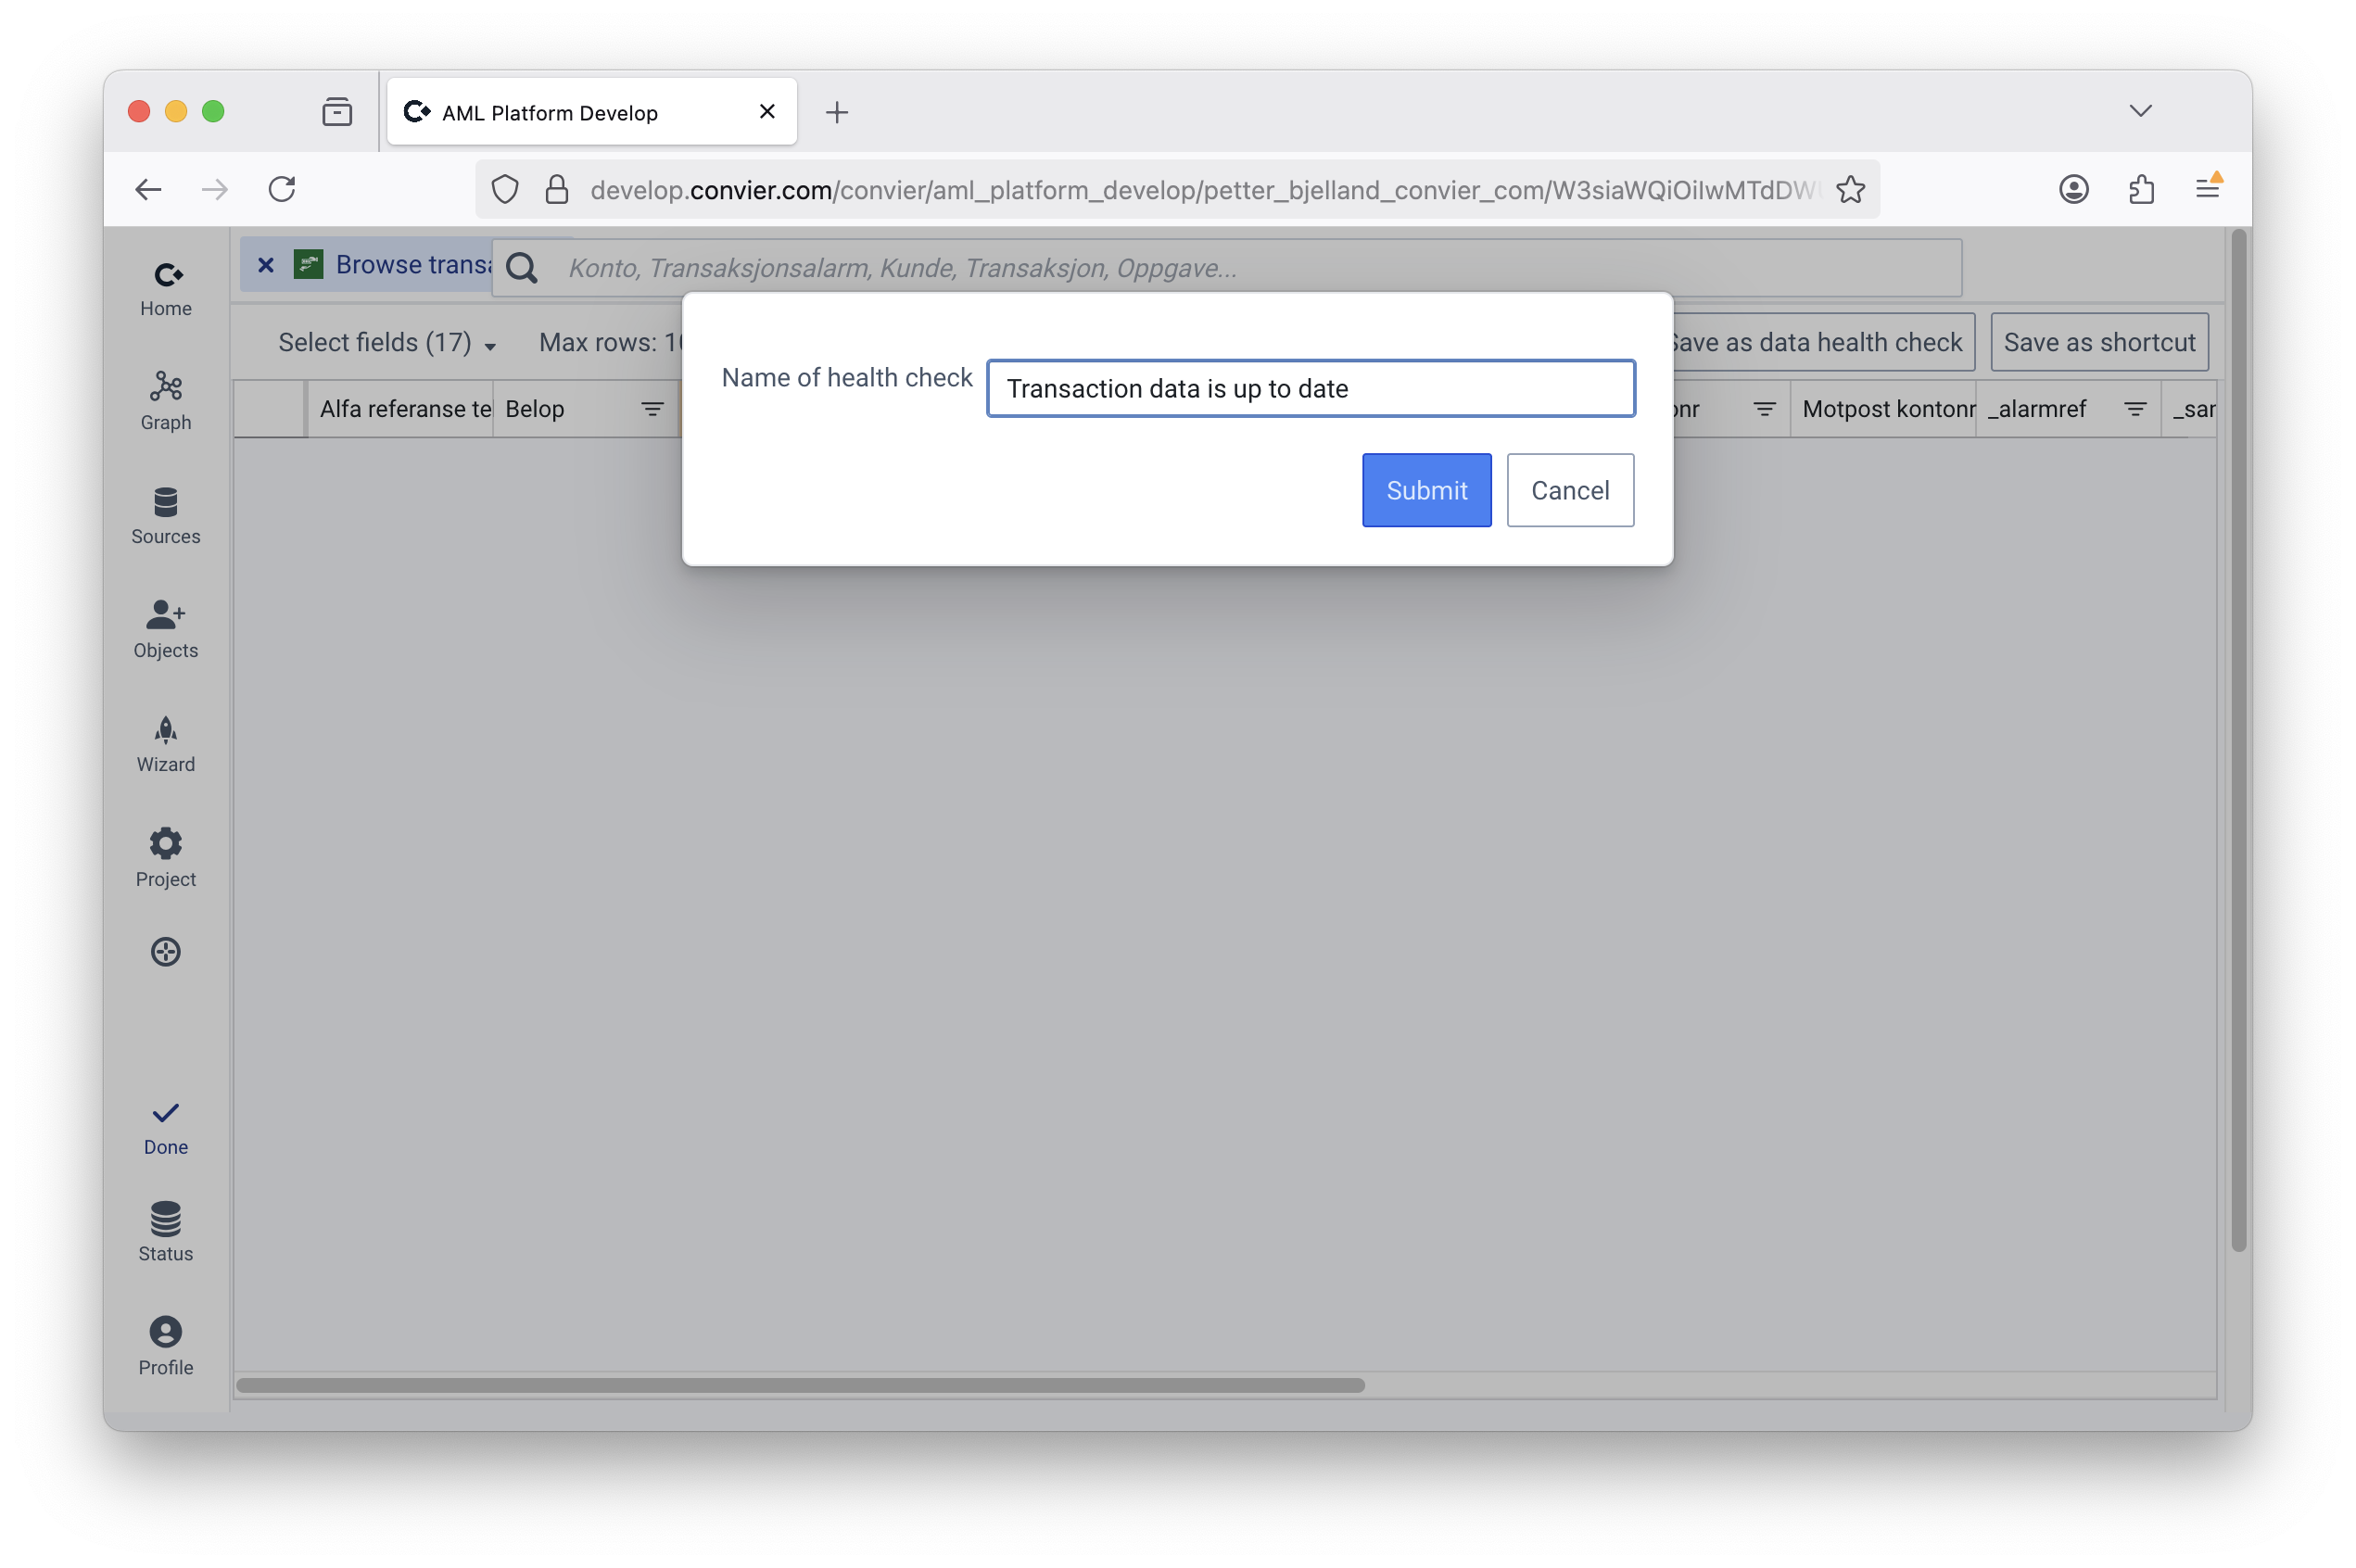
Rules can be established to monitor that conected data sources are correct and up to date. Typical checks include the presence of transactions or KYC answers that are less than N days old, and exist to make sure ingestion jobs are running.
Data health checks are configured in edit mode from the Browse application in Convier, and results are available through the API and on the project home page. In simple configuration, the check is healthy if at least one object is found using the configured filters (e.g. at least one transaction from the last 24 hours).
The health checks on a source are shared between users authorized to connect to the source, and are by default refreshed every five minutes.

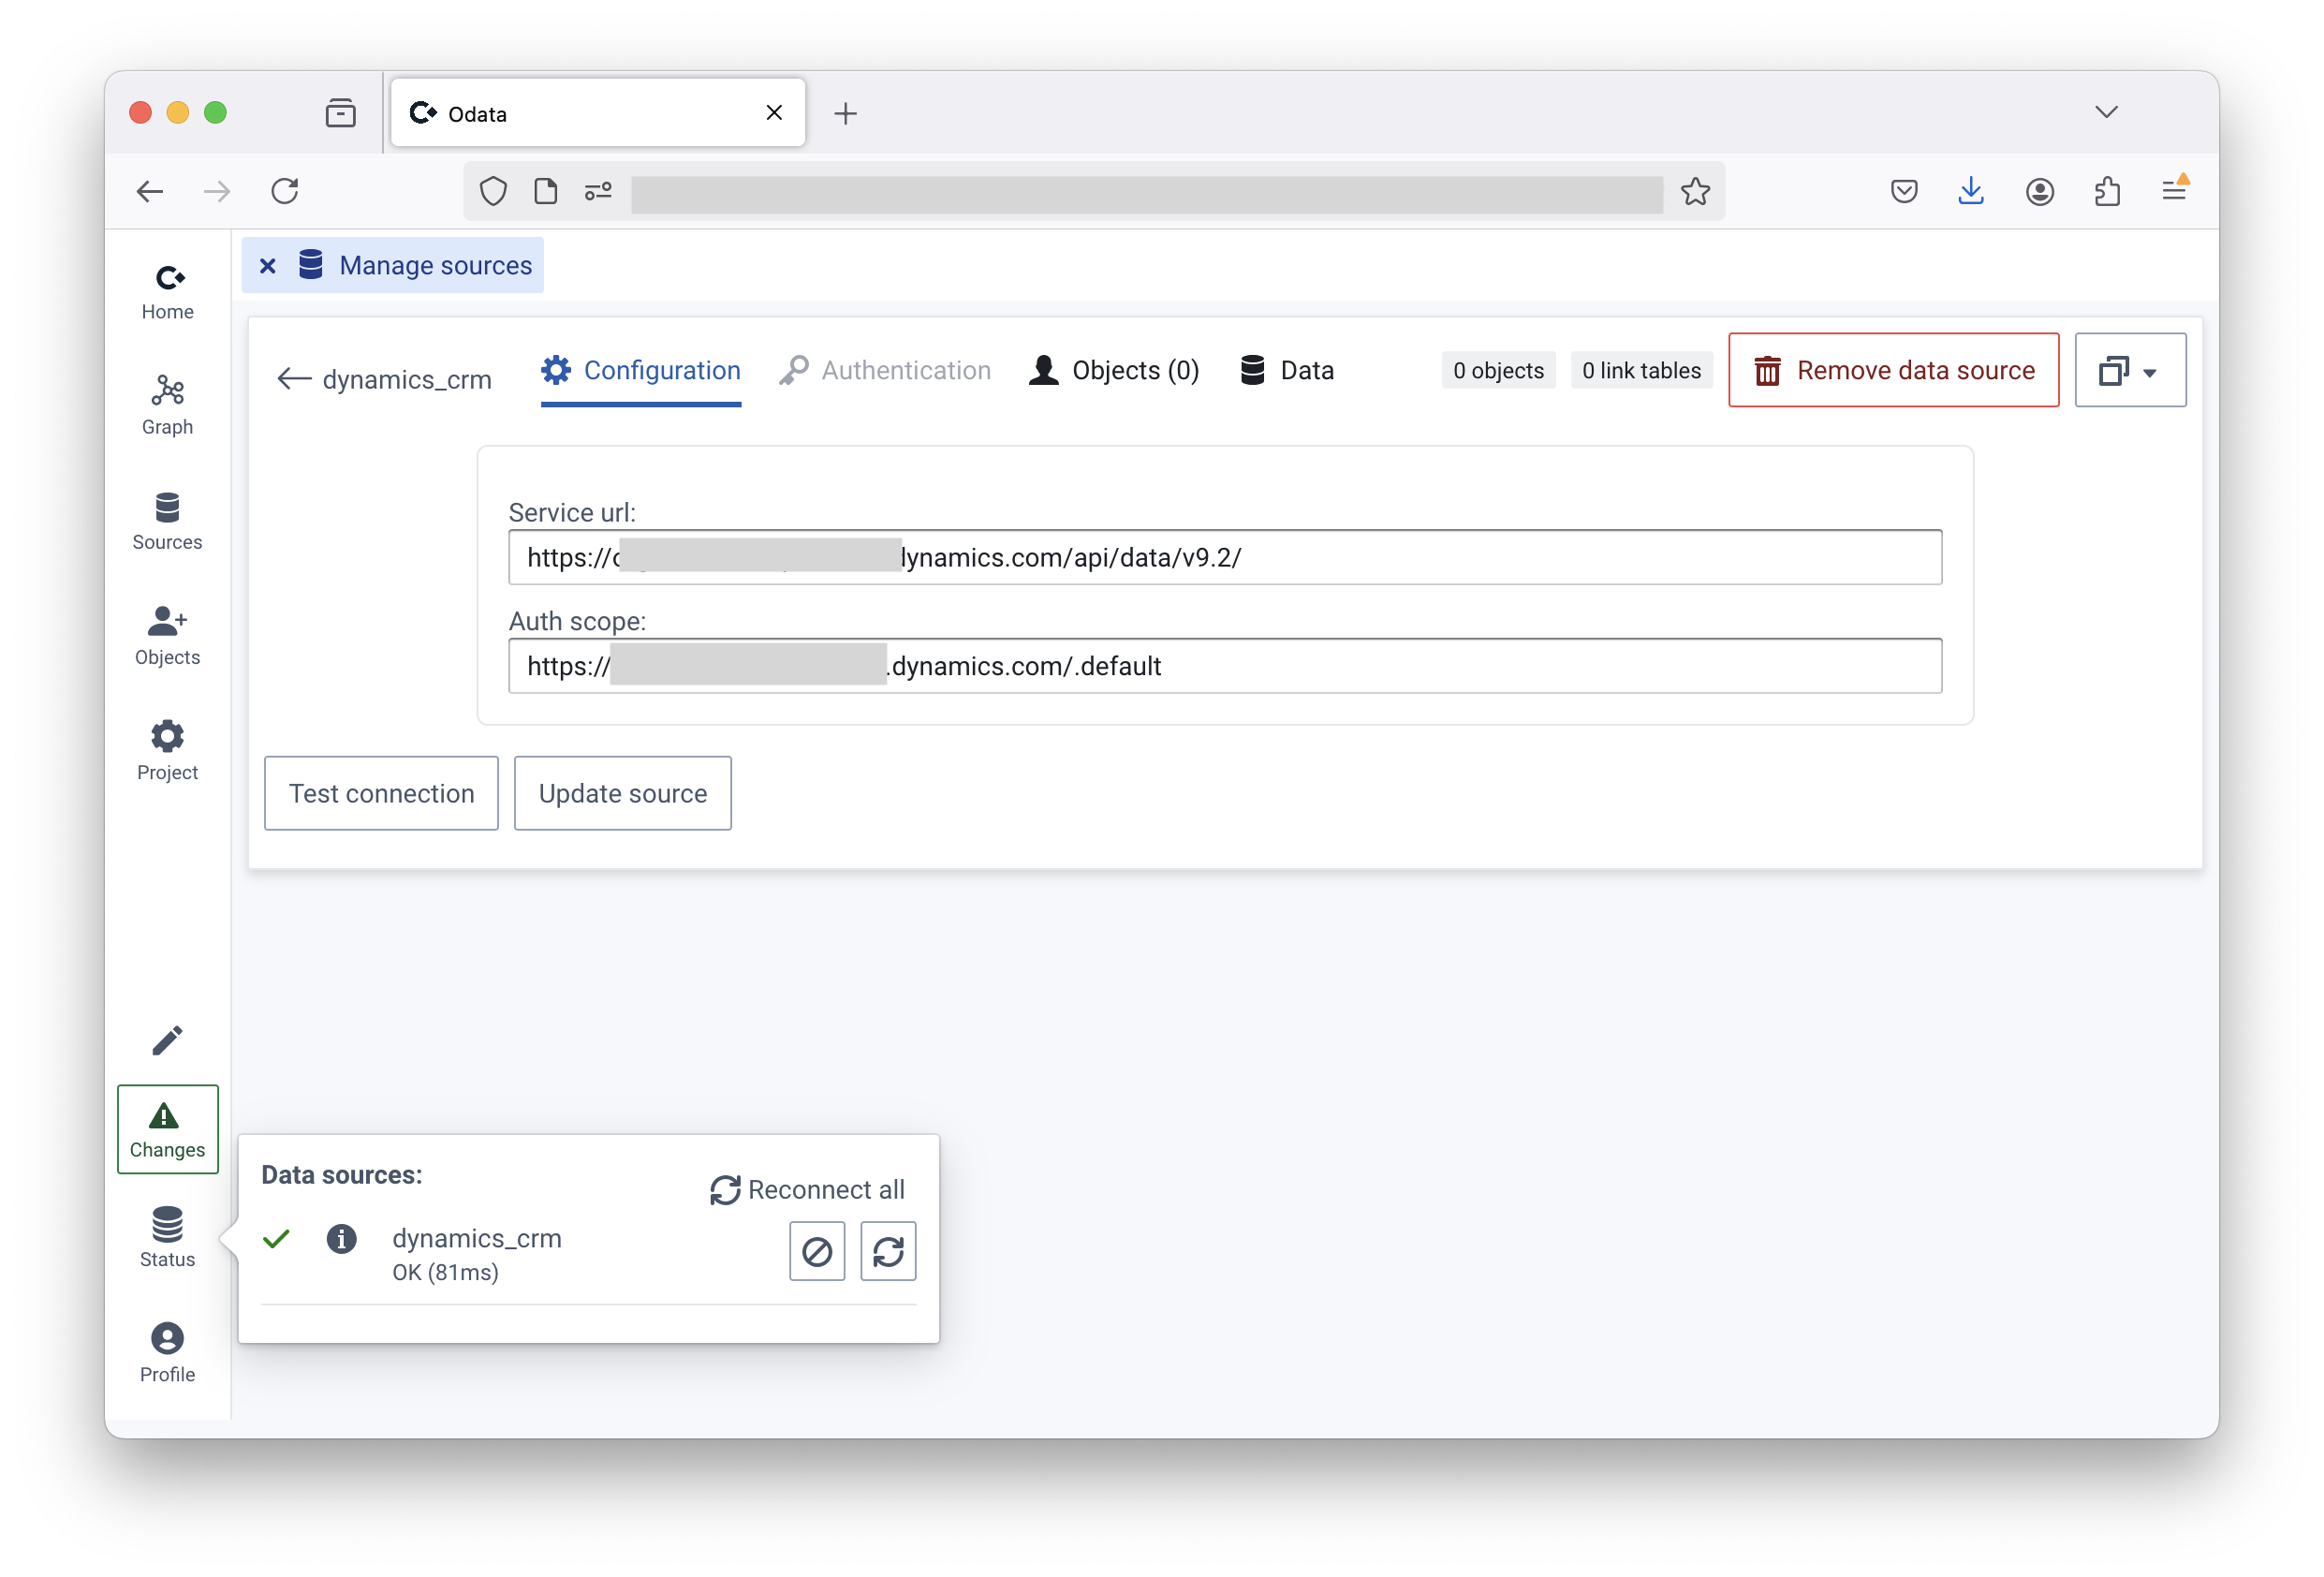
File: Dynamics CRM API
How to get to the “Manage sources” page
Convier supports Odata APIs like the Dyanmics CRM API. This enables Convier to both read from and write data to the Dynamics platform (or other CRM that has an API).
https://{identifier}.dynamics.com/api/data/{version} and click “Update source”
https://org123456.api.crm19.dynamics.com/api/data/v9.2https://{identifier}.dynamics.com/.default
https://org123456.api.crm19.dynamics.com/.defaultBy default, the Dynamics CRM API supports giving delegated access to applications using the “user_impersonation” scope. Giving this access to the Convier app registration (or other applications) lets the application access Dynamics on behalf of the user, inheriting the user’s permissions. As this would enable Convier to access whatever the user can access in Dynamics, this is for security reasons not desired. In our experience, it is only relevant for Convier to access one or a few “entity sets”, for example a list of Enhanced Due Diligence tasks.
The following is a guide to give the Convier app registration “application” access to an individual entity set in Dynamics. This will enable the Convier app to work with the entity tasks without relying on user permissions, which also prevents Convier from being able access other parts of Dynamics.
Please note that giving application access only should be given in combination with requiring assignment to the Coniver app registration. Without it, it could become possible for authenticated users who are not themselves authorized to access the entity set to access it through Convier.
Contact Convier Support if you are having problems connecting Convier to your Dynamics CRM installation.
File: Technical documentation
This category gives an overview over installation and configuration of the Convier platform, as well as a description of the technical architecture.
File: Data sources
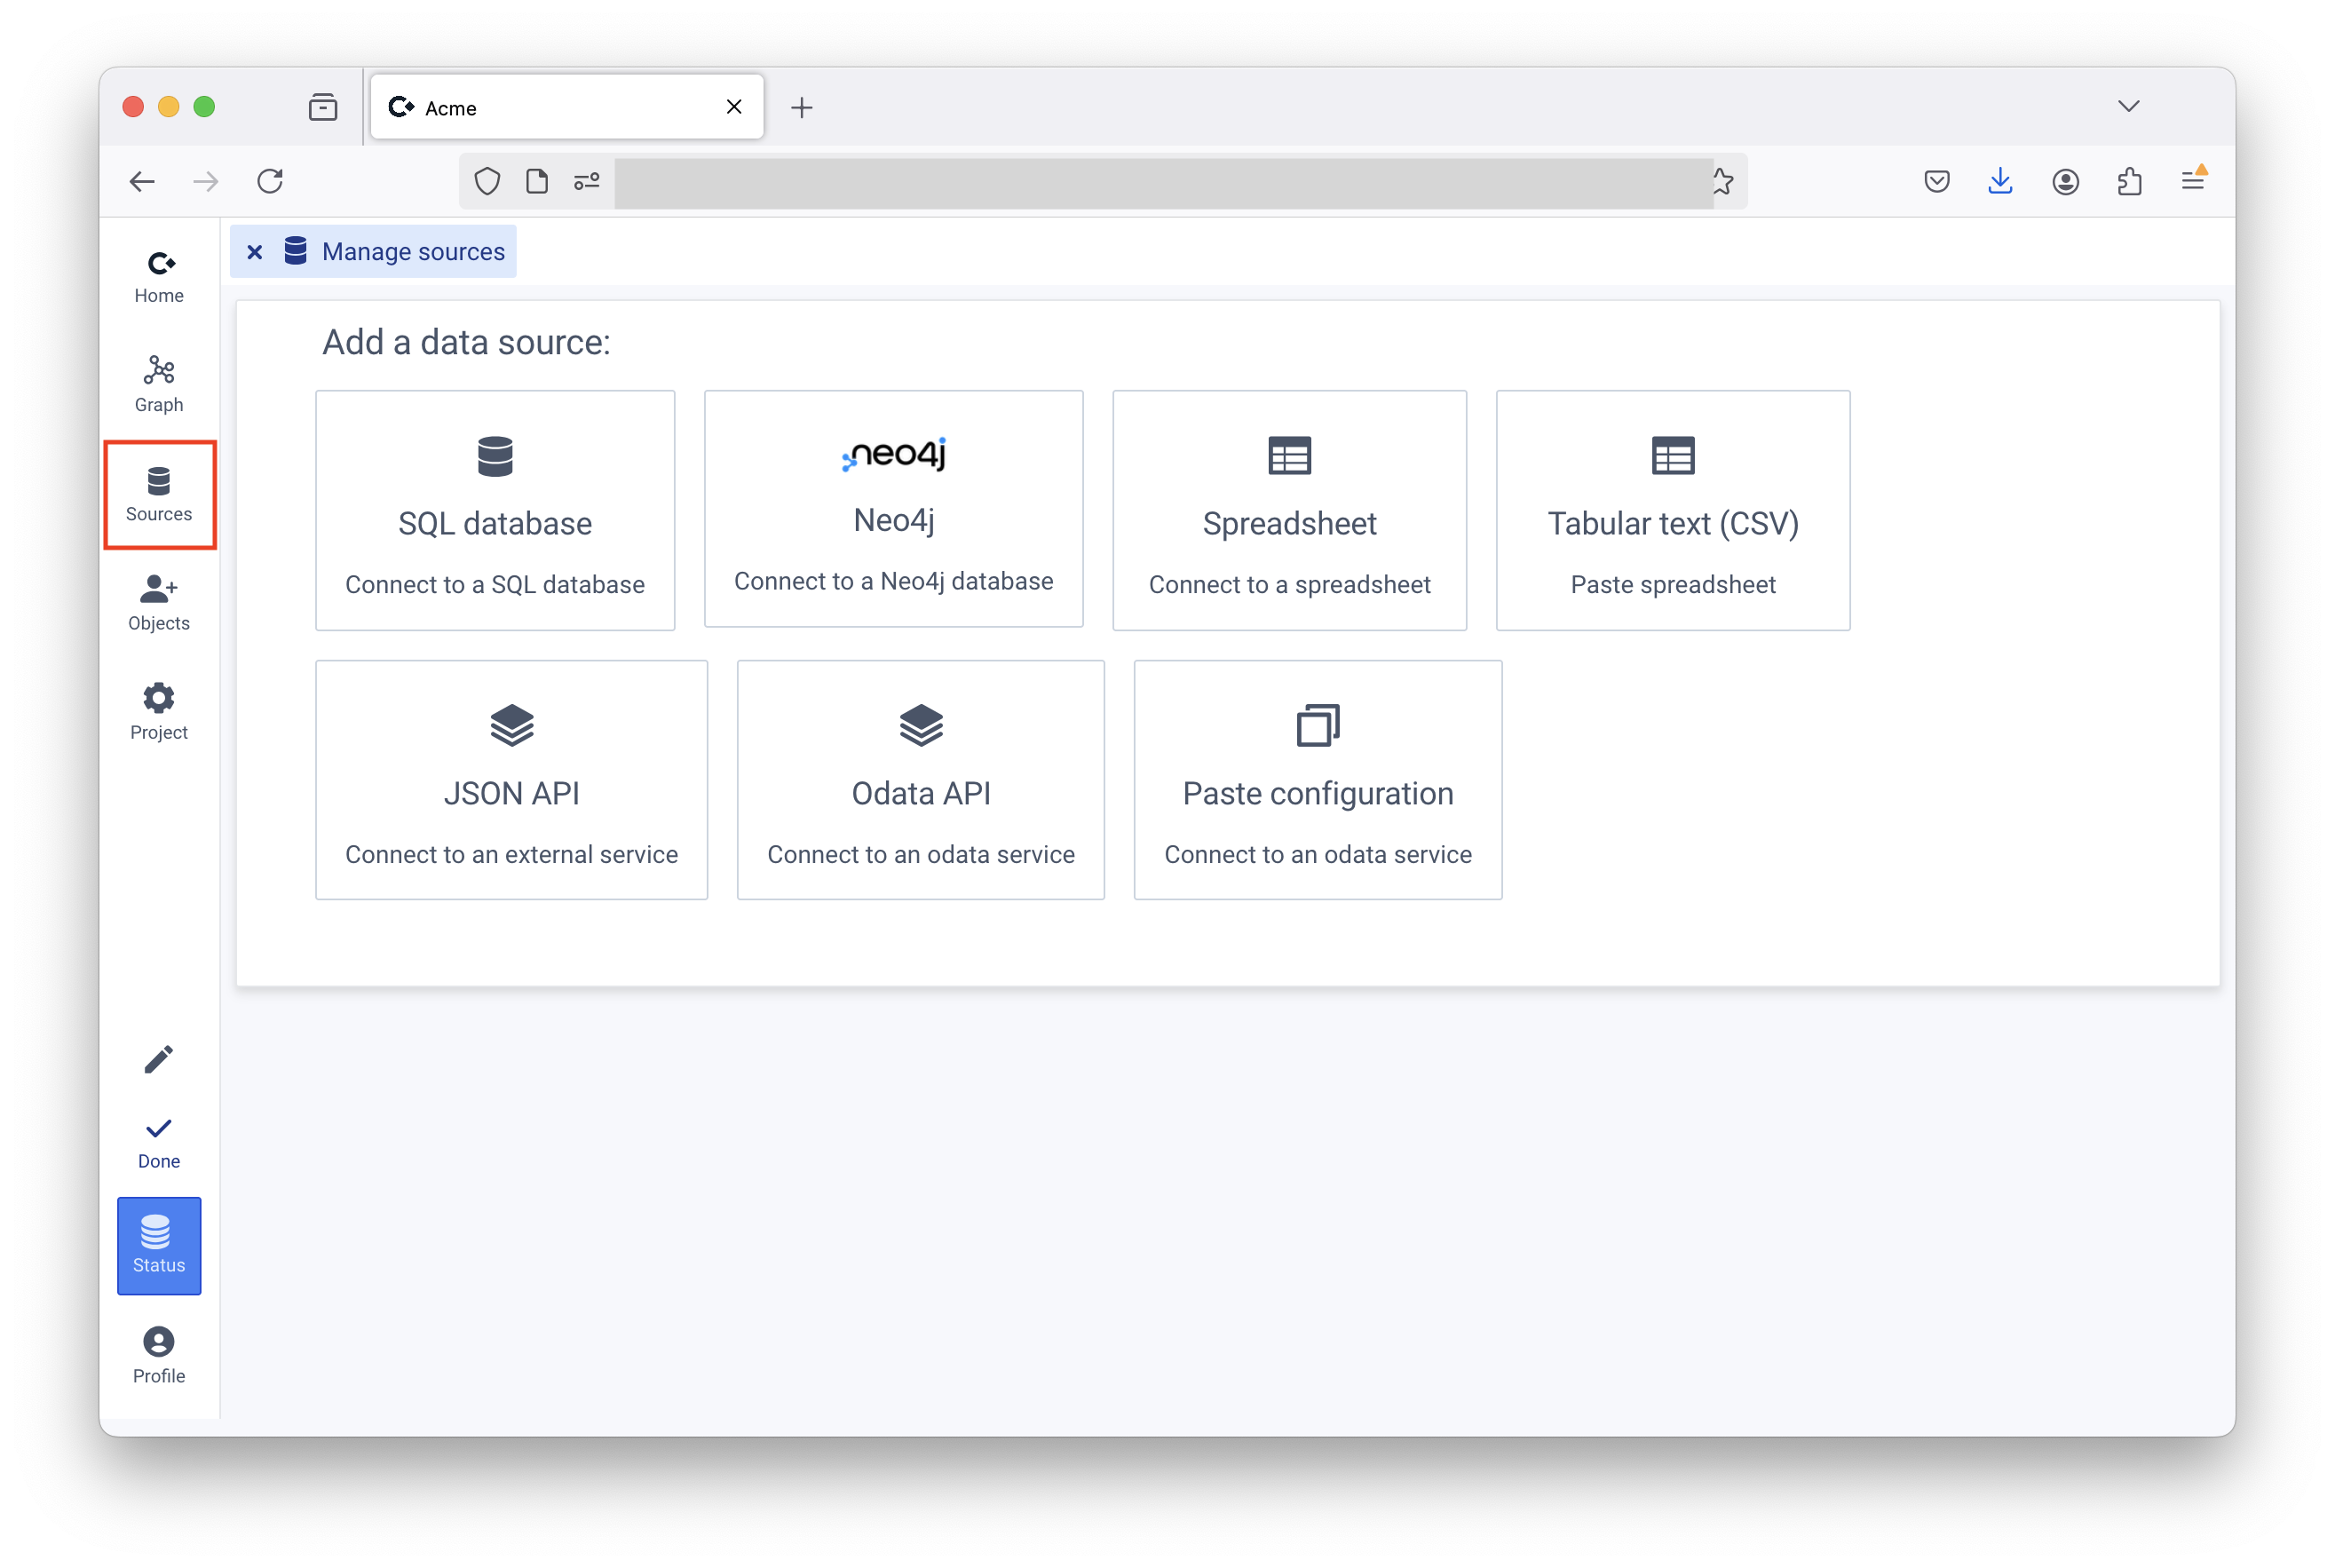
Common to connecting to all data sources, is to first switch to edit mode, and then going to the “Manage sources” page of the project. Supported data sources that are not yet described here include Spreadsheets from OneDrive, CSV-sources (data stored in config) and Neo4j.
File: Information Security
Convier Information Security Officer: Petter Chr. Bjelland (CTO): petter.bjelland@convier.com
There are multiple levels of authentication and authorization in Convier:
The first level is firewall/network configuration. As Convier is installed within your infrastrcture, only clients within the internal network should be able to reach the server. The second level of security is user authentication and authorization with OIDC/OAuth. A client (App Registration in Azure) is created, which Convier uses for access control. Users and groups are granted access to this client. Users without access cannot reach the application or any projects. A user has to be assigned role Task.Read and/or Task.Manage in the App Registration to be able to access Convier. By default, only users with the Manage role can create projects in Convier.
Instance managers have the option to invalidate all authenticated sessions, forcing re-authentication and authorization. This may be relevant after an incident, for example after misconfiguration of access.
Convier uses OIDC to authenticate and authorize users. An authenticated user will be assigned one cookie stored in its browser:
CONVIER_SESSION_ID: A randomly generated string, mapped to generated JWTs and refresh token server side. Refresh tokens are persisted in the internal Convier database, encrypted using with a random IV and key from CONFIG_B64_ENCRYPTION_KEY. Tokens can be revoked by admin users.The cookie is stored with flags Secure, HttpOnly and SameSite=Lax.
Within a project, users have the role of Read, Manage, or Own. Users with the Own role control who has access to the project.
Projects can be shared with app roles (most commonly Task.Read) and individual users, including those who have not logged in yet (though they still need to pass the first level to gain access). Users are assigned a role in the project.
It’s also possible to create new App Roles in the OIDC client and grant access to projects based on these. Users must then be assigned the App Role, for example through the Application Registration page in the Azure Portal, to gain access.
Difference between Read and Manage in a project:
Manage users can create configurations for other users within the project.Read users can make changes for themselves and propose changes but cannot save changes for others.It is possible to share projects with users who haven’t logged in yet, but not with users who don’t have access to the application. Access to the application is controlled through your existing AD and access control/SSO.
Similar to projects, individual data sources within a project, like databases or APIs, may be associated with a role. If a required role is specificed, users without the role will be prevented from seeing, connecting to, or retrieving data from the source. In addition to preventing access to the source, Convier makes a best effort to remove any metadata about the source from the configuration available to the user. Metadata that is removed includes the names of the fields loaded from the source, how it is presented, and how it is reported on.
Note: The data model configured from a restricted data source will be visible to all users who have access to the project. The data model contains type name (like “Customer”), icon and fields (like “Name”). This information is not removed as it would break configuration functionality. If the data model itself is considered too sensitive to be visible, a separate project should be created for the data source.
Convier supports encrypted communication with both client and data sources. How TLS is implemented on client-server communication depends on the installation pattern that is used. Convier can boot with a PKCS12 export (e.g. Let’s Encrypt) directly, or behind a proxy that handles encryption, e.g. Azure App Service.
Convier stores project configuration, including data source credentials, in a database. Credentials are never sent to the frontend application. This database can be configured to be stored in an external database server, but by default it is stored in a SQLite database persisted locally next to the service. The contents of the configuration is by default encrypted with AES256, but a different encryption method may be configured. The symmetric AES256 key is provided to the service as an environment variable, either in the .env file next to docker-compose.yml, or through the configuration of the Azure App Service.
The encryption key in environment variable CONFIG_B64_ENCRYPTION_KEYcan be changed by following the following steps:
JDBC_CONNECTION_STRING)openssl rand -base64 32 Make a copy of this keyCONFIG_B64_ENCRYPTION_KEY_ROLLINGRoll encryption key that has appearedCONFIG_B64_ENCRYPTION_KEYCONFIG_B64_ENCRYPTION_KEY_ROLLING (normal changes will be blocked while set)Other sensitive information Convier needs to operate includes the secret for the OIDC client used for authentication. This secret, as well as other OIDC configuration is provided to the service as environment variables, either in the .env file next to docker-compose.yml, or through the configuration of the Azure App Service.
Our Software Development Life Cycle (SDLC) is designed to provide both high development speed and secure deployments. It also enables customers to anticipate and test future releases by setting up development. We actively use internal and external static code analysis, dependency analysis, unit and integration tests to ensure the security and correctness of our software. All changes that are shipped to customers are first reviewed by at least two Convier employees.
When issues (security or functional) in the software are identified, they are assigned a priority between P0 and P3:
We use Github dependabot for automatic vulnerability detection and dependency updates. Each identified vulnerability in a 3rd party library is assessed, and patches for high severity vulnerabilities are merged and released without unnecessary delay. In the case of a critical vulnerability, Convier will reach out to relevant customer resources.
Independent, third-party penetration testing of the Convier application is performed on a regular basis, and in relation to larger changes that may affect application security. The last third-party penetration test was performed October 2024 and identified issues have been resolved. The test report is available upon request.
If you want to attach a security agent (e.g. from Contrast Security) or similar to the service, you can do so by setting the environment variable JAVA_OPTS=-javaagent:/path/to/agent.jar.
File: Checklist Installation
The purpose of this document is to list common steps needed to install a Convier instance up until the creation of a project.
https://convier.acme.com/convier).
public_url./convier.openid profile offline_access).client_id, client_secret, and openid-configuration URL.
https://login.microsoftonline.com/<tenant_id>/v2.0/.well-known/openid-configurationpublic_url as an accepted redirect URL for login.Task.Manage and Task.Read, and assign users and groups to appropriate roles (users who will create projects and configure data collection and reporting should have Task.Manage). Make sure to activate Assignment required.CERTBOT_FULL_CERT_CONTENT.
https://convier.azurecr.io.convier:releaseJDBC_CONNECTION_STRING)JDBC_CONNECTION_STRINGJDBC_USERNAMEJDBC_PASSWORDpublic_url and verify that you can log in and see an empty project list.File: Logging and Auditing
Updated for version: 0.2601.1
Convier produces two different types of logs: Service logs and Audit logs.
The service logs contains a mix of access log and other internal service related log entries. It is produced using log4j. An excerpt from an access log:
2024-12-18T07:29:11: [INFO]  INFO - 123.123.123.123 - user@acme.com [18/Dec/2024:07:29:11 +0000] "PUT /convier/api/read/aml_platform_develop/main/count HTTP/1.1" 200 53 "-" "Mozilla/5.0 (Macintosh; Intel Mac OS X 10.15; rv:133.0)"
2024-12-18T07:29:11: [INFO]  INFO - Post-filtering 157 found links
2024-12-18T07:29:11: [INFO]  INFO - 123.123.123.123 - user@acme.com [18/Dec/2024:07:29:11 +0000] "POST /convier/api/async-read/aml_platform_develop/main/request HTTP/1.1" 200 18406 "-" "Mozilla/5.0 (Macintosh; Intel Mac OS X 10.15; rv:133.0)"
The access log format may be modified using the LOG_FORMAT environment setting. See the Undertow documentation for more information.
The audit log is written to Azure Log Service or a SQL database of your choice, but must be enabled. To remove the possibility of removing traces of misuse, it is recommended that users of Convier do not have access to this database themselves.
Use the configuration settings:
INTERNAL_AUDIT_LOG_JDBC_CONNECTION_STRING (mandatory, convier will not start if not set)INTERNAL_AUDIT_LOG_JDBC_USERNAMEINTERNAL_AUDIT_LOG_JDBC_PASSWORDTables and fields in the audit logging database is automatically created.
https://$endpointName.$region.ingest.monitor.azure.com)convier_audit_log
{
"oidc_client_id":"guid",
"BRANCH":"main",
"USER_ID":"user@example.com",
"PAYLOAD":"{}",
"TOPIC":"SEARCH",
"RESPONSE":"{\"status\":\"OK\"}",
"PROJECT_ID":"prod"
}dcr-...)Custon-$name_CL)https://$endpointName.$region.ingest.monitor.azure.com/dataCollectionRules/$dcrImmutableId/streams/$tableName?api-version=2023-01-01AZURE_AUDIT_LOG_WORKSPACE_URL to the full URLMonitoring Metrics Publisher on the Data Collection RuleDeprecated: Data Collector API is being retired by Microsoft Q3 2026 (https://learn.microsoft.com/en-us/azure/azure-monitor/logs/custom-logs-migrate)
Log Analytics Reader to users who should be able to query to audit logWorkspace ID and set as environment variable AZURE_AUDIT_LOG_WORKSPACE_ID in ConvierAZURE_AUDIT_LOG_WORKSPACE_URL. It defaults to https://{workspaceId}.ods.opinsights.azure.com/api/logs?api-version=2016-04-01Agents, then Linuxand copy the Primary Key value. Set as environment variable AZURE_AUDIT_LOG_SHARED_KEY in ConvierCONVIER_AUDIT_LOG_CL is created automatically. The name can be overridden by setting environment variables AZURE_AUDIT_LOG_TABLE_NAME (_CL is added automatically). Make sure to adjust retention settings per your needs (Default is 30 days)An audit log entry contains the following fields:
We currently do not include raw response playloads in the audit log, as they may be quite large. Audit log entries are immediately written to the database, there are not written in batches.
These are the topics being logged
connect_to_sourcesearchbrowse_dataload_objectget_linked_objectscountcompute_analyticsload_report_datareport_savereport_other_actionAn example log entry on the search topic:
| field | value |
|---|---|
| project_id | aml |
| branch | main |
| timestamp | 2024-12-10T10:00:00Z |
| user_id | user@acme.com |
| topic | search |
| payload | {"query":"test","fields":["CUSTOMER_NAME"],"sourceIds":["dwh"]} |
| response | {"status": "OK"} |
File: Config Orchestration
The project in a Convier instance can be configured by another Convier instance. A typical use case for this, is to have the User Acceptance Testing environment manage the Production environment, to make sure testing occurs in a relaistic environment. It also enables multiple banks to securely share the same Convier configuration. Below is a list of steps needed to set up Config Orchestration when running with Azure/Entra ID, followed by some information security considerations.
One (orchestrating instance), create project A (orchestrating project)Two (orchestrated instance), create project B (orchestrated project)Two, add app role Task.Orchestrate. Set that only applications can be given access.One, add the created role as an application permission and grant admin consentB, go to Config, Manage project and add acess Orchestrate to role Task.OrchestrateOne, make sure environment variable ORCHESTRATION_ENABLED is set to true (otherwise you will not see the button mentioned in the next step)One go to OrchestrationA, the URL of Two (with /convier at the end), app scope (application id of app registration used by Two), click “Get instance projects”, select B and click add.A to BOrchestrate is able see and change the configuration of the project, but is not allowed to access any data. It is technically allowed to perform normal requests like search and load, but it is prohibited from connecting to any data sources. This means that any search or load request will return an empty result, or an error message. Any such requests will be logged as normal in the audit logs.B (disable auto merge, go to created branch, add auth, merge).
The deploy mechanism will also try to avoid overwriting instance specific config, like base URLs to APIsFile: Report storage
Updated for version: 0.2504.1
Reports generated in Convier can be stored in a database (“internal”), or in an existing system, like Microsoft Dynamics (“external”). Storage and retriveal of externally stored reports are configured using data sources, analytics and actions.
Reports may be stored in Azure Storage Account containers. You may store reports in different containers for different reports actions, for example a mutable container store for latest working copy of a report, and a immutable (“write-only-read-many”) container for archived/completed reports. It requires that either Managed Identity is available, or that Convier is running with an App Registration from Entra ID.
Environment variables:
AZURE_STORAGE_ACCOUNT_SUBSCRIPTION_IDAZURE_STORAGE_ACCOUNT_RESOURCE_GROUPAZURE_STORAGE_ACCOUNT_NAMEEnvironment variables:
GOOGLE_PROJECT_IDGOOGLE_STORAGE_BUCKET_NAMESInternal storage is enabled by setting the following environment variables:
REPORT_STORAGE_JDBC_CONNECTION_STRINGREPORT_STORAGE_JDBC_USERNAME (Optional)REPORT_STORAGE_JDBC_PASSWORD (Optional)To verify that internal report storage is enabled, check the service log for the following message INFO - Internal report storage: enabled.
If enabled, the required table and columns needed are automatically created. A row is added to the table each time a user clicks “Save” on the report, so there can be multiple versions of the same task/case/report. Each row consists of the following data:
| column | type | example |
|---|---|---|
| project_id | ID of proejct | aml |
| inserted | Epoch ms | 1735813124631 |
| user_id | ID of user saving the report | user@acme.com |
| object_id | ID of task/case/report | EDD-1234-001 |
| content | Report JSON | [{"sectionId": "Intro", "content": {...}}, ...] |
| loaded_data | Report data JSON (if enabled) | {"timestamp": ..., "object": {...}, "connected": {...}} |
| loaded_data_simplified | Properties and data model | {"object_types": ..., "field_types": {...}, "data": {...}} |
| section_texts | Report section texts | {"Intro": "Lorem ipsum...", ...} |
| action | Save/Close/Approve/etc. | Save |
While a user is editing a report, a copy of the contents is stored within the user’s browser (using IndexedDB). This is to prevent loss of data in case of system, network or power outage, or in the case of events like accidental page refresh.
File: Running as App Service in Azure
Convier can run within an Single Docker Container App Service in Azure. The Docker image is downloaded from Convier’s private repository, hosted on Azure. It can be assigned to its own subscription and resource group. By default the application writes config to a persistent storage attached to the app service, which by default is backed up every hour. The application can automatically upgrade when new versions of the Docker image becomes available.
Register a single tenant enterprise application, e.g. named Convier Single Tenant from the Azure portal. Single tenant means the enterprise applications only can be used within your organization.
Under app registrations, API permissions, add permission User.Read this allows the app to fetch basic information about logged in users.
Under app registrations, App roles, add three roles:
Task.ReadTask.ManageGroups can be assigned to the different roles. The only difference between Task.Read and Task.Manage is the ability to make changes for other users. Task.Audit is allowed to query the audit log.
If you want to restrict access to Convier to certain users/groups, see the documentation in Azure for how to restrict access to the application.
Create a client secret that will be used by the Convier app to authorize users.
Optionally create a new subscription for the App Service.
The following are two different methods to set up Convier as an App Service on Azure. The first option is the preferred and simplest method.
Please note that with local (default) configuration, Convier does not support redundancy, make sure instance count is 1, or configure a central database connection (JDBC_CONNECTION_STRING).
Open Azure Portal, click “Create a resource”, search for “Template deployment” and select “Template deployment (deploy using custom templates)”.

Click “Create”, then “Build your own template in the editor”. Paste in the following in the editor:
{
  "$schema": "https://schema.management.azure.com/schemas/2019-04-01/deploymentTemplate.json#",
  "contentVersion": "1.0.0.0",
  "parameters": {
    "docker_username": {
      "type": "string"
    },
    "docker_password": {
      "type": "securestring"
    },
    "oidc_client_id": {
      "type": "string"
    },
    "oidc_client_secret": {
      "type": "securestring"
    },
    "encryption_key": {
      "type": "securestring"
    }
  },
  "variables": {
      "unique_suffix": "[tolower(uniqueString(resourceGroup().Id))]",
      "app_name": "[concat('convier-', variables('unique_suffix'))]",
      "app_plan_name": "[concat('convier-app-plan-', variables('unique_suffix'))]",
      "instance_url": "[concat('https://', variables('app_name'), '.azurewebsites.net/convier')]",
      "oidc_config_endpoint": "[concat('https://login.microsoftonline.com/', subscription().tenantId, '/v2.0/.well-known/openid-configuration')]"
  },
  "resources": [
    {
      "type": "Microsoft.Web/serverfarms",
      "apiVersion": "2018-02-01",
      "name": "[variables('app_plan_name')]",
      "location": "[resourceGroup().location]",
      "sku": {
        "name": "B1",
        "tier": "Basic"
      },
      "kind": "linux",
      "properties": {
        "reserved": true
      }
    },
    {
      "type": "Microsoft.Web/sites",
      "apiVersion": "2016-08-01",
      "name": "[variables('app_name')]",
      "location": "[resourceGroup().location]",
      "tags": {},
      "kind": "app,linux,container",
      "dependsOn": [
        "[variables('app_plan_name')]"
      ],
      "properties": {
        "enabled": true,
        "hostNameSslStates": [
          {
            "name": "[variables('instance_url')]",
            "sslState": "Disabled",
            "hostType": "Standard"
          }
        ],
        "serverFarmId": "[resourceId('Microsoft.Web/serverfarms', variables('app_plan_name'))]",
        "siteConfig": {
          "linuxFxVersion": "DOCKER|convier.azurecr.io/convier:stable"
        },
        "httpsOnly": true,
        "publicNetworkAccess": "Disabled"
      }
    },
    {
      "type": "Microsoft.Web/sites/config",
      "apiVersion": "2018-11-01",
      "name": "[concat(variables('app_name'), '/appsettings')]",
      "properties": {
        "DOCKER_REGISTRY_SERVER_URL": "https://convier.azurecr.io",
        "DOCKER_REGISTRY_SERVER_USERNAME": "[parameters('docker_username')]",
        "DOCKER_REGISTRY_SERVER_PASSWORD": "[parameters('docker_password')]",
        "WEBSITES_ENABLE_APP_SERVICE_STORAGE": "true",
        "CONFIG_B64_ENCRYPTION_KEY": "[parameters('encryption_key')]",
        "JDBC_CONNECTION_STRING": "jdbc:sqlite:/home/convier.db",
        "OIDC_CLIENT_ID": "[parameters('oidc_client_id')]",
        "OIDC_CLIENT_SECRET": "[parameters('oidc_client_secret')]",
        "OIDC_CONFIGURATION_ENDPOINT": "[variables('oidc_config_endpoint')]",
        "OIDC_SCOPES": "[concat(parameters('oidc_client_id'), '/.default offline_access')]",
        "PUBLIC_URL": "[variables('instance_url')]",
        "OIDC_ROLE_MANAGE": "Task.Manage",
        "SERVER_PORT": "80"
      },
      "dependsOn": [
        "[resourceId('Microsoft.Web/sites', variables('app_name'))]"
      ]
    }
  ]
}
Click “Save”. You should see something like the below:
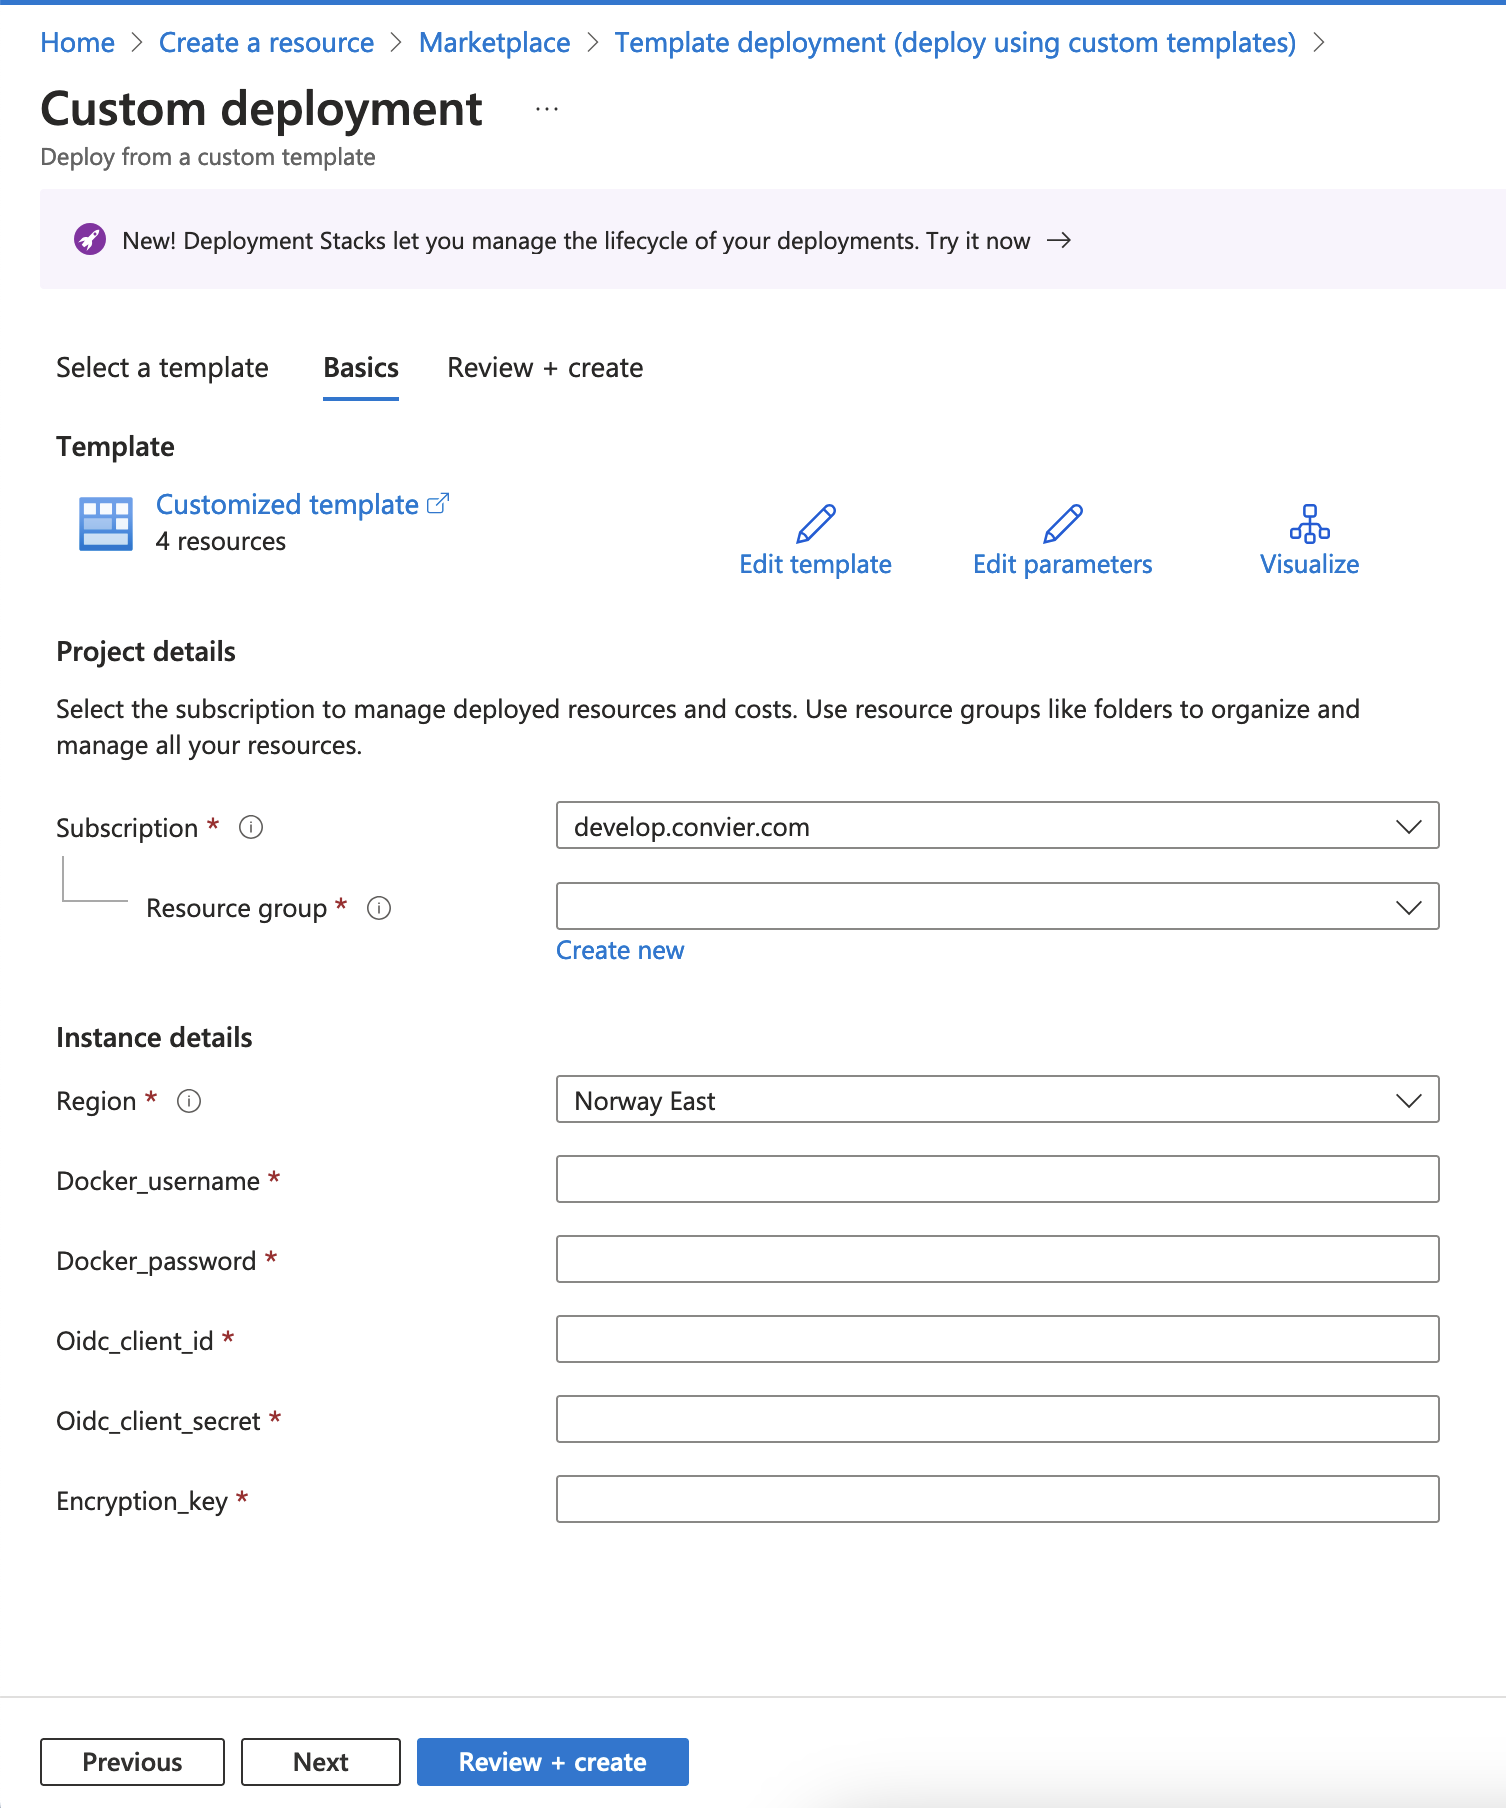
Fill in the requested information. You should receive the docker username and password through a secure channel from Convier. The encryption key can be generated using openssl rand -base64 32. The Convier team can also assist in generating this key. Click “Review + Create”, and then “Create”. Once the deployment has completed, click “Go to resource group” to set up the network configuration for the App Service. By default no one is allowed access to the service.
Optionally create a new resource within the chosen subscription for the App Service.
Optionally create a new app service plan.
Create a new Web App App Service and assigned it to the chosen subscription and resource group. Give the app an appropriate name and add the following configuration:
Basics
Docker
DOCKER_REGISTRY_*)Networking
Review and create
To add a layer of security, from the app service portal, add restrictions to which IP addresses can access the application.
The Convier app accepts configuration in the form of environment variables. These configurations are enrypted and stored within Azure by Microsoft.
Under Configuration, click Advanced edit and add the following entries:
[
  {
    "name": "CONFIG_B64_ENCRYPTION_KEY",
    "value": "<encryption key, see below>",
    "slotSetting": false
  },
  {
    "name": "DOCKER_ENABLE_CI",
    "value": "true",
    "slotSetting": false
  },
  {
    "name": "DOCKER_REGISTRY_SERVER_URL",
    "value": "https://convier.azurecr.io",
    "slotSetting": false
  },
  {
    "name": "DOCKER_REGISTRY_SERVER_USERNAME",
    "value": "<docker username>",
    "slotSetting": false
  },
  {
    "name": "DOCKER_REGISTRY_SERVER_PASSWORD",
    "value": "<docker password>",
    "slotSetting": false
  },
  {
    "name": "JDBC_CONNECTION_STRING",
    "value": "jdbc:sqlite:/home/convier.db",
    "slotSetting": false
  },
  {
    "name": "INTERNAL_AUDIT_LOG_JDBC_CONNECTION_STRING",
    "value": "jdbc:sqlite:/home/audit.db",
    "slotSetting": false
  },
  {
    "name": "OIDC_CLIENT_ID",
    "value": "<client id>",
    "slotSetting": false
  },
  {
    "name": "OIDC_CLIENT_SECRET",
    "value": "<client secret>",
    "slotSetting": false
  },
  {
    "name": "OIDC_CONFIGURATION_ENDPOINT",
    "value": "https://login.microsoftonline.com/<tenant id>/v2.0/.well-known/openid-configuration",
    "slotSetting": false
  },
  {
    "name": "OIDC_ROLE_MANAGE",
    "value": "Task.Manage",
    "slotSetting": false
  },
  {
    "name": "OIDC_SCOPES",
    "value": "openid profile offline_access",
    "slotSetting": false
  },
  {
    "name": "PUBLIC_URL",
    "value": "public_url",
    "slotSetting": false
  },
  {
    "name": "SERVER_PORT",
    "value": "80",
    "slotSetting": false
  },
  {
    "name": "WEBSITES_ENABLE_APP_SERVICE_STORAGE",
    "value": "true",
    "slotSetting": true
  }
]
Scope offline_access enables users to stay logged in.
A key CONFIG_B64_ENCRYPTION_KEY to enable encryption of configuration. The value of CONFIG_B64_ENCRYPTION_KEY must be a 32 character random string (e.g generated with openssl rand -base64 32). It is an AES encryption key used for symmetric encryption of configuration in the internal database. The internal database is by default a SQLite database stored in the persistent storage.
JDBC_CONNECTION_STRING the full connection string to the database that will contain configuration.
INTERNAL_AUDIT_LOG_JDBC_CONNECTION_STRING the full connection string to the database that will store audit logs.
SCM Basic Auth Publishing Credentials and share the webhook URL under deployment center with the Convier team. The app will also check for updates on restart.File: Salesforce API
How to get to the “Manage sources” page
Salesforce OIDC
$entraSalesforceAppId)user_impersonationuser_impersonation on Salesforce OIDC
convierconvierhttp://localhost (not in use)Manage user data via APIs (api)checkedcheckedEnable Token Exchange Flow under OAuth Flows and External Client App EnhancementsConsumer key ($consumerKey) and Consumer secret ($consumerSecret)https://login.microsoftonline.comAuth.Oauth2TokenExchangeHandler, create one and use the following implementation:global class ConvierTokenExchangeHandler extends Auth.Oauth2TokenExchangeHandler {
private static final String OIDC_AUDIENCE = '$entraSalesforceAppId';
private static final String EXTERNAL_IDP_JWKS_URL = 'https://login.microsoftonline.com/$tenantId/discovery/v2.0/keys';
private Auth.UserData getUserDataFromJWT(Auth.JWT jwt) {
String email = (String) jwt.getAdditionalClaims().get('upn');
Auth.UserData userData = new Auth.UserData(null, null, null, null, email, null, null, null, null, null, null);
return userData;
}
private User findExistingUser(Auth.UserData data) {
String email = data.email;
List<User> existingUser = [SELECT Id, Username, Email, FirstName, LastName, Alias, ProfileId FROM User WHERE Email=:email LIMIT 1];
if (existingUser.isEmpty()) {
return null;
}
return existingUser[0];
}
// Manual extraction of audience, as built-in method does not seem to exist
private string getAudience(String incomingToken) {
List<String> parts = incomingToken.split('\\.');
Integer pad = Math.mod(4 - Math.mod(parts[1].length(), 4), 4);
String padding = '='.repeat(pad);
String payloadB64 = parts[1].replace('-', '+').replace('_', '/') + padding;
String payloadJson = EncodingUtil.base64Decode(payloadB64).toString();
Map<String, Object> claims = (Map<String, Object>) JSON.deserializeUntyped(payloadJson);
Object audClaim = claims.get('aud');
if (audClaim instanceof String) {
return (String) audClaim;
} else if (audClaim instanceof List<Object>) {
return (String)((List<Object>)audClaim)[0];
}
return null;
}
global override Auth.TokenValidationResult validateIncomingToken(String appDeveloperName, Auth.IntegratingAppType appType, String incomingToken, Auth.OAuth2TokenExchangeType tokenType) {
Auth.JWT jwt = Auth.JWTUtil.validateJWTWithKeysEndpoint(incomingToken, EXTERNAL_IDP_JWKS_URL, true);
String audience = getAudience(incomingToken);
if (!audience.equals(OIDC_AUDIENCE)) {
return new Auth.TokenValidationResult(false);
}
Datetime expClaim = (Datetime) jwt.getAdditionalClaims().get('exp');
if (expClaim < Datetime.now()) {
return new Auth.TokenValidationResult(false);
}
Auth.UserData userData = getUserDataFromJWT(jwt);
if (userData == null) {
return new Auth.TokenValidationResult(false);
}
return new Auth.TokenValidationResult(true, null, userData, incomingToken, tokenType, null);
}
global override Boolean mapToUser(Id networkId, Auth.TokenValidationResult result, Boolean canCreateUser, Boolean canCreateContact, String appDeveloperName, Auth.IntegratingAppType appType) {
return true;
}
global override User getUserForTokenSubject(Id networkId, Auth.TokenValidationResult result, Boolean canCreateUser, String appDeveloperName, Auth.IntegratingAppType appType) {
Auth.UserData data = result.getUserData();
return findExistingUser(data);
}
}
conviertokenexchangehandlerconviertokenexchangehandlerAccess TokenConvierTokenExchangeHandlerconvieryour userMake conviertokenexchangehandler the default handler for this app$entraSalesforceAppId/.defaulthttps://$yourDomain.salesforce.com/services/oauth2/token$consumerKey$consumerSecrethttps://$yourDomain.salesforce.comwhoami
/services/oauth2/userinfo$Enable Client Credentials Flow$consumerKey and $consumerSecrethttps://$yourDomain.salesforce.com/services/oauth2/tokenPOST$consumerKey$consumerSecretFile: Snowflake
How to get to the “Manage sources” page
See the Snowflake documentation for more details on security integrations in Snowflake.
This page assumes you are using Entra ID / Azure AD, and that the OIDC client for Convier is already set up. We also assume the use role session:CONVIER_SNOWFLAKE_USER. Adjust role according to your setup.
Refefences:
$tenantId$convierObjectIdYou find Object ID under “Entprise Applications” in the Azure Portal, next to “Application ID”
References:
$snowflakeAppIdIf you connect to Snowflake using a security integration, you can choose between delegated and application access. In delegated mode, the Convier will authenticate on behalf of users, meaning that users in Convier also must exist in Snowflake. In application mode, the Convier application is given access directly to Snowflake, and any user who has access to the created project and source in Convier, will have access to Snowflake. The decision between these two will affect where audit logging should occur.
Use this security integration if you want to authenticate individual users in Snowflake.
In Azure, add “scope” session:CONVIER_SNOWFLAKE_USER to $snowflakeAppId.
In Snowflake:
CREATE OR REPLACE SECURITY INTEGRATION external_oauth_azure_1
  TYPE = external_oauth
  ENABLED = true
  EXTERNAL_OAUTH_TYPE = azure
  EXTERNAL_OAUTH_ISSUER = 'https://sts.windows.net/$tenantId/'
  EXTERNAL_OAUTH_JWS_KEYS_URL = 'https://login.microsoftonline.com/$tenantId/discovery/v2.0/keys'
  EXTERNAL_OAUTH_AUDIENCE_LIST = ('api://$snowflakeAppId')
  EXTERNAL_OAUTH_TOKEN_USER_MAPPING_CLAIM = 'upn'
  EXTERNAL_OAUTH_SNOWFLAKE_USER_MAPPING_ATTRIBUTE = 'login_name'
This assumes users are automatically synced with Entra ID (e.g. using SCIM), and that the user has role CONVIER_SNOWFLAKE_USER in Snowflake.
Use this if you want to give the OIDC client itself access to Snowflake.
In Azure, add “app role” session:CONVIER_SNOWFLAKE_USER to $snowflakeAppId
In Snowflake, create system user:
CREATE USER CONVIER_APP
  LOGIN_NAME = '$convierObjectId'
  DISPLAY_NAME = 'Convier';
Then create security integration:
CREATE OR REPLACE SECURITY INTEGRATION external_oauth_azure_1
  TYPE = external_oauth
  ENABLED = true
  EXTERNAL_OAUTH_TYPE = azure
  EXTERNAL_OAUTH_ISSUER = 'https://sts.windows.net/$tenantId/'
  EXTERNAL_OAUTH_JWS_KEYS_URL = 'https://login.microsoftonline.com/$tenantId/discovery/v2.0/keys'
  EXTERNAL_OAUTH_AUDIENCE_LIST = ('api://$snowflakeAppId')
  EXTERNAL_OAUTH_TOKEN_USER_MAPPING_CLAIM = 'sub'
  EXTERNAL_OAUTH_SNOWFLAKE_USER_MAPPING_ATTRIBUTE = 'login_name'
You’ll need to include EXTERNAL_OAUTH_ANY_ROLE_MODE = 'ENABLE' to the query above if you use the default session:role-any.
It is also possible to connect to Snowflake using basic credentials. In these cases, create a user with password in Snowflake, then select “Basic credentials” under authentication below.
In Convier:
{
  "account": "<account-identifier>",
  "db": "<database id>",
  "schema": "<schema>",
  "warehouse": "<warehouse>",
  "role": "CONVIER_SNOWFLAKE_USER"
  "JDBC_QUERY_RESULT_FORMAT": "JSON"
}
api://$snowflakeAppId/.defaultapi://$snowflakeAppId/.defaultocsp.snowflakecomputing.com:80, or add "disableOCSPChecks": "true" to the properties jsonSTAGE endpoints in snowflake, so that Convier is able to load results larger than 100kb (SELECT SYSTEM$ALLOWLIST_PRIVATELINK())api://$snowflakeAppId/session:scope:.., then audience must be api://$snowflakeAppId. If scope is $snowflakeAppId/session:scope:.., audience must be just $snowflakeAppId. If there is a mismatch, you will get an error EXTERNAL_OAUTH_JWS_CANT_RETRIEVE_PUBLIC_KEY.?appid=$snowflakeAppId to the end of EXTERNAL_OAUTH_JWS_KEYS_URL to be able to locate the correct kidFile: SQL Sources
By default, Convier can connect to SQL server / Aure SQL, Postgres, SQLite and Snowflake databases. Connections to databases are established using JDBC. Table of contents below for more details.
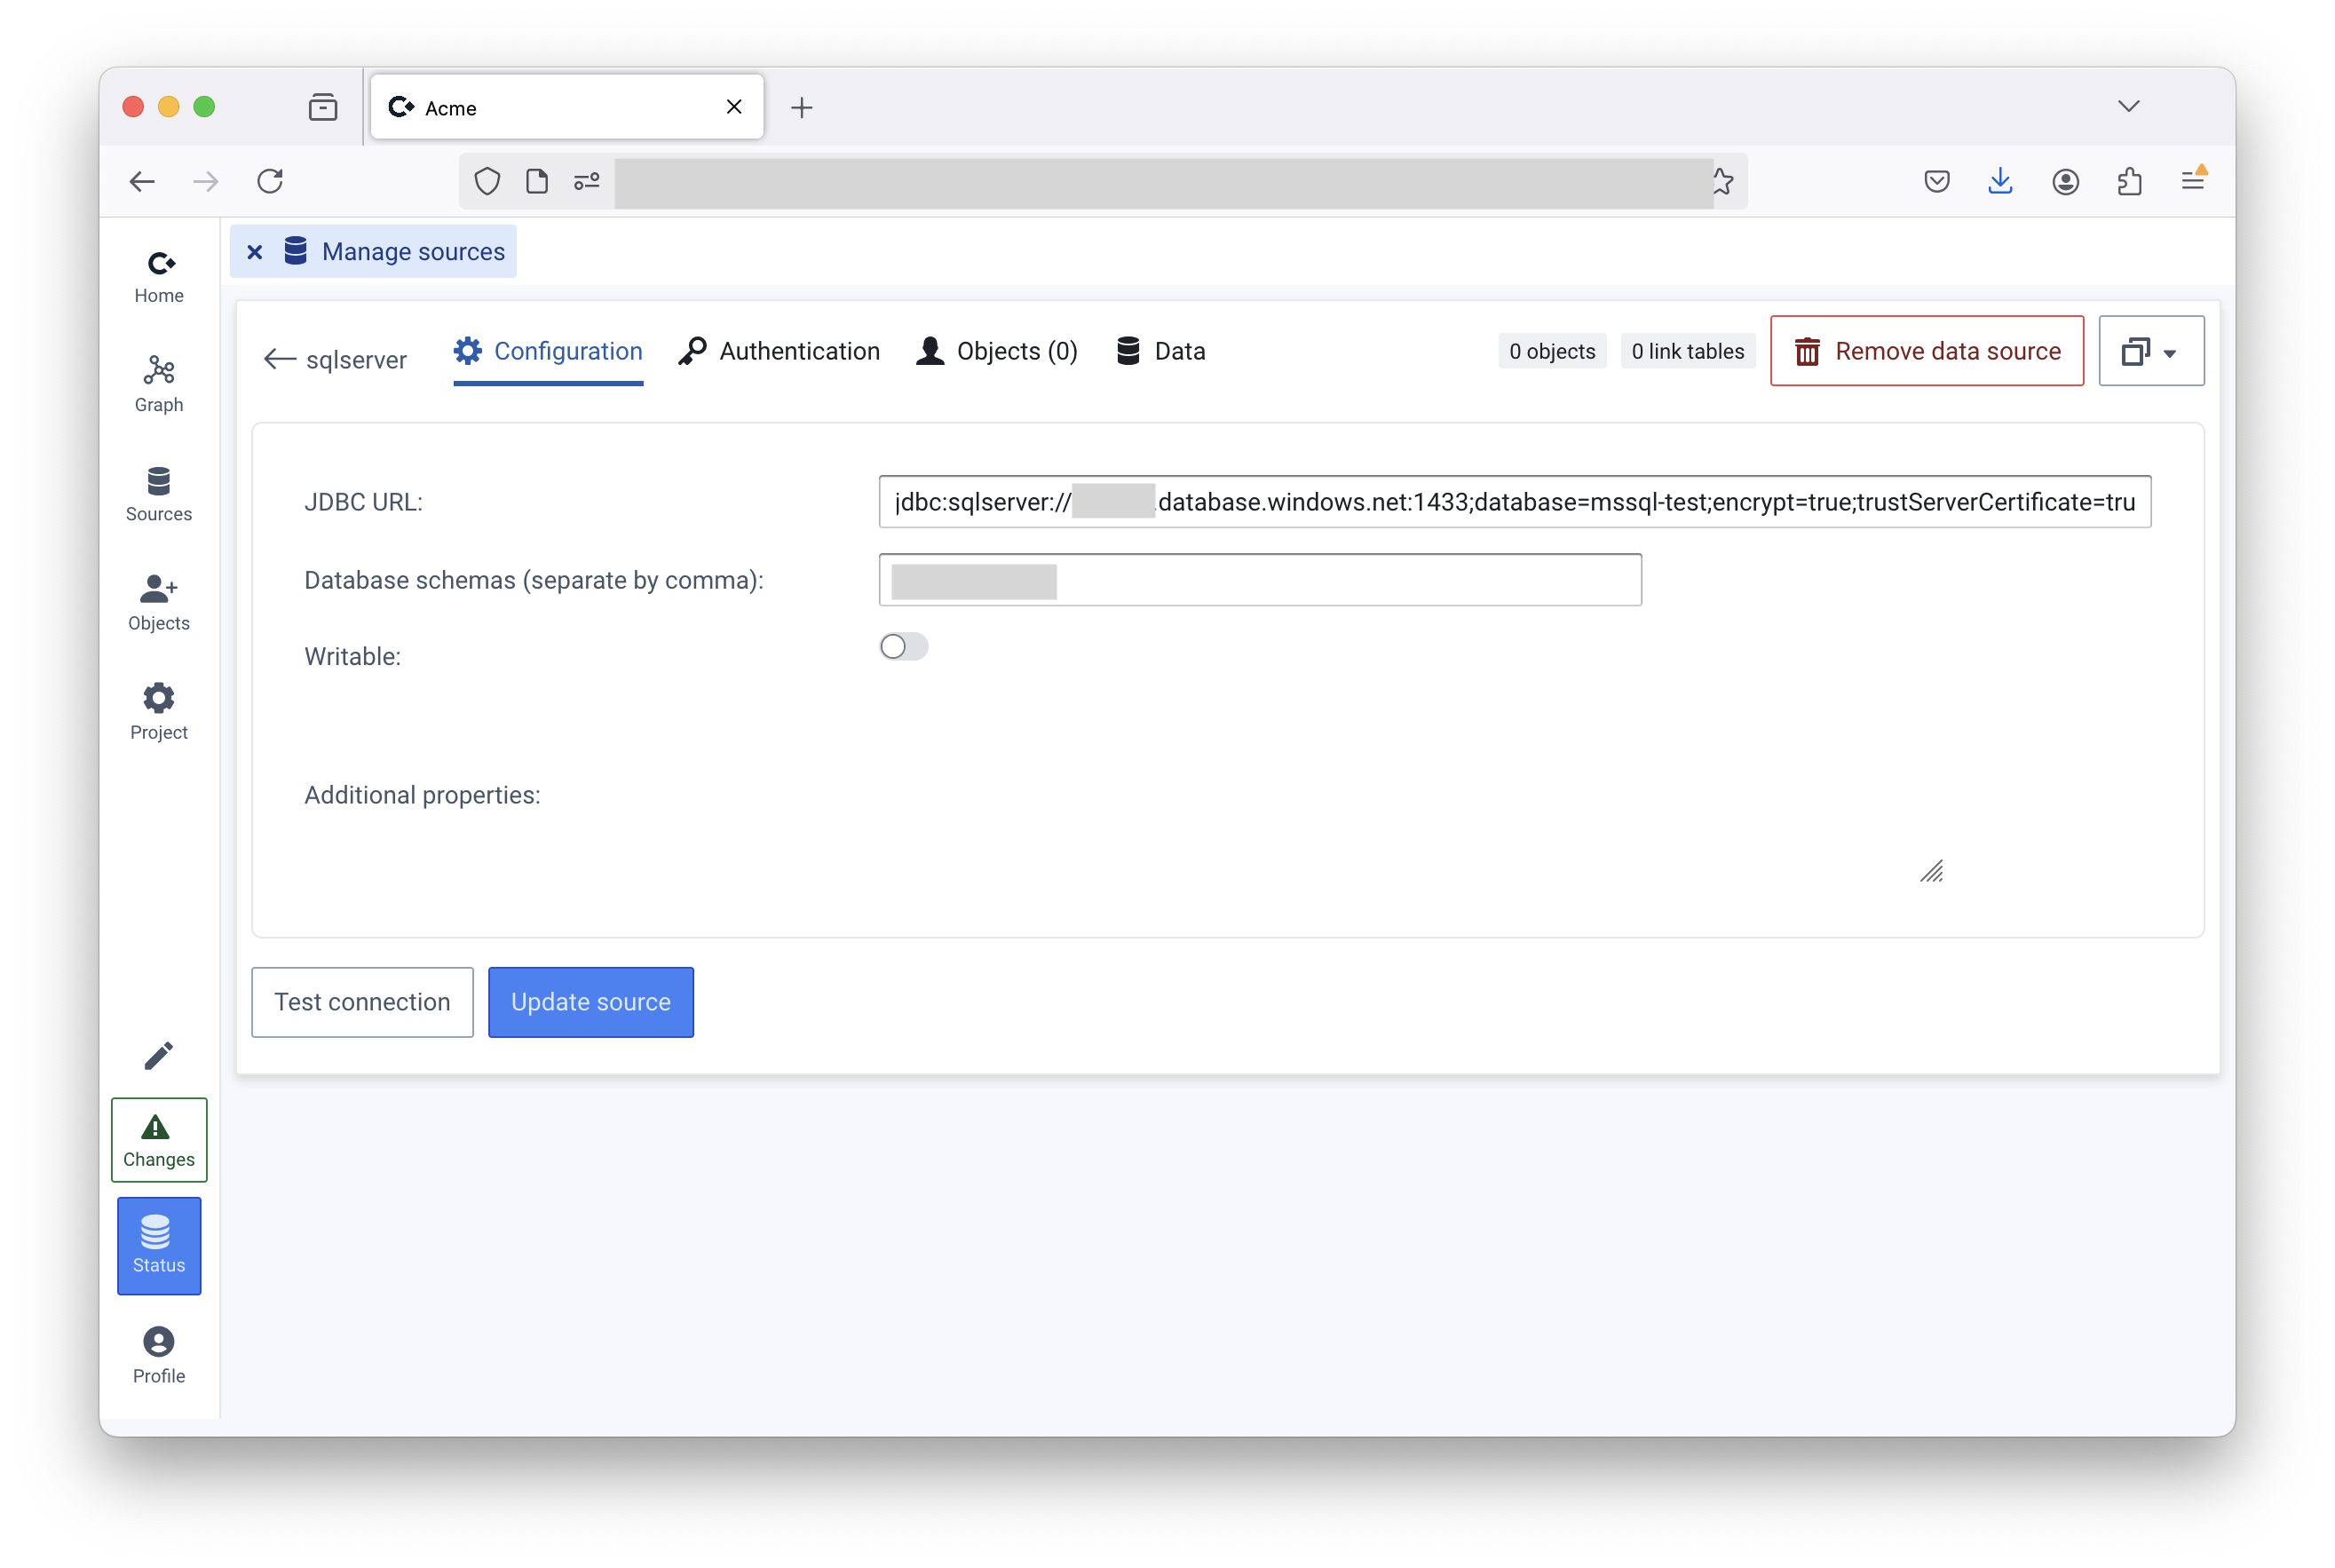
File: SQL Server / Azure SQL
<- How to get to the “Manage sources” page
authentication=ActiveDirectoryManagedIdentityIn the SQL database, make sure the Enterprise Application used to authenticate Convier users is added
* CREATE USER [<name of enterprise app registration>] FROM EXTERNAL PROVIDER
In Convier, click “Authentication”
Select “App token”

File: Support
File: Telemetry
Enabling telemetry data is optional, but is helpful for Convier to know which versions of the software is running, which migrations have run, and some metadata about use and resources. Telemetry data helps the software development process. The telemetry data is sent once when the systems starts and contains the following information:
Telemetry is enabled by setting the environment variables TELEMETRY_APP_ID to something descriptive, e.g. “acme_prod”.
The telemetry data is be sent to https://telemetry.convier.com. Some changes in firewall settings may be needed.